Introduction
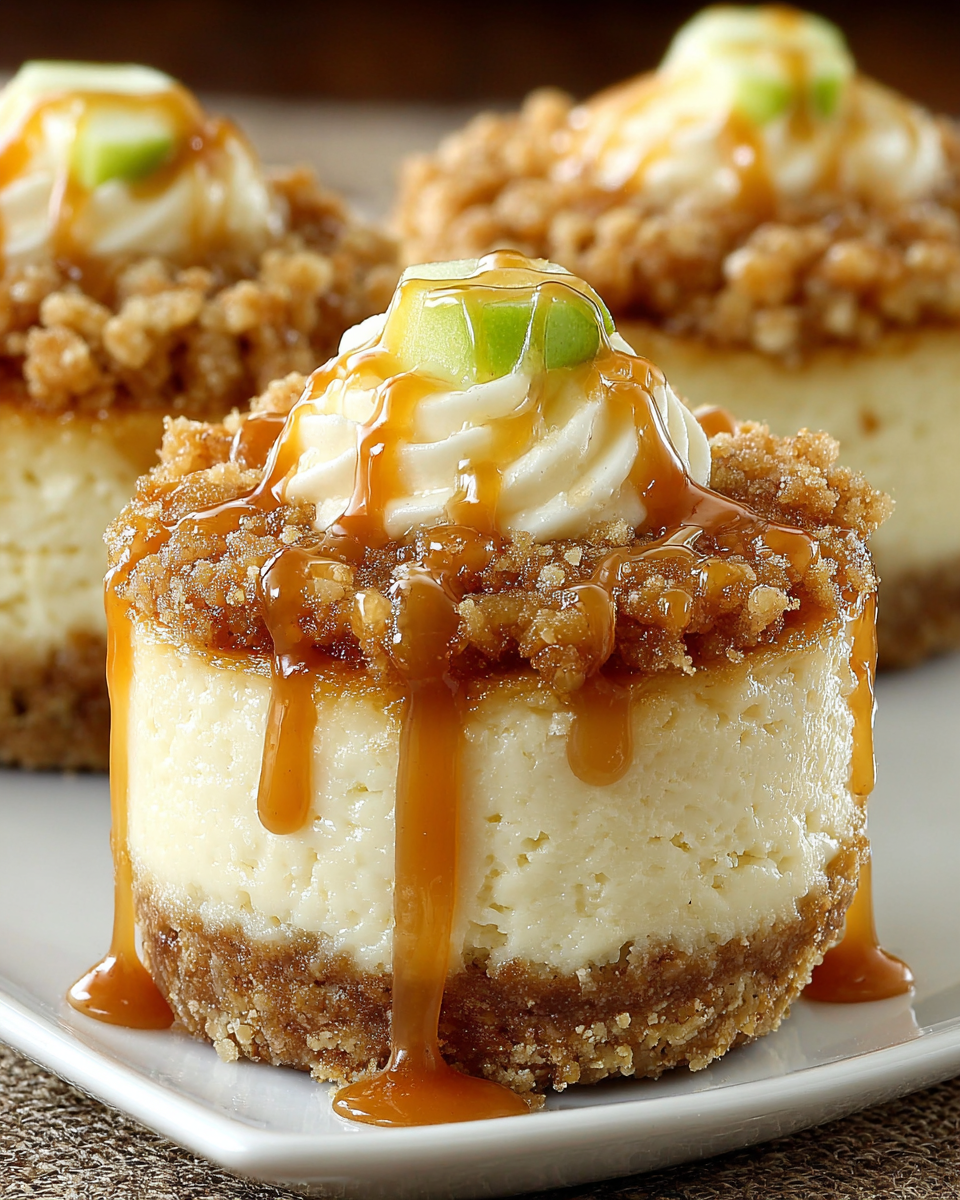
The vibrant flavors of caramel and apple come together beautifully in these Caramel Apple Crisp Mini Cheesecakes, making them the perfect treat for any occasion. With a crunchy oat topping and creamy filling, these mini desserts are a twist on the classic apple crisp.
Each bite is an explosion of autumnal comfort, showcasing the sweet-tart notes of fresh apples balanced with the rich, buttery taste of caramel. Not only are these cheesecakes delightful to eat, but they also present beautifully, adding a touch of elegance to your dessert table.
Ingredients
- 1 cup crushed graham crackers
These add a buttery crunch that forms the base of the cheesecake, providing texture and a slight sweetness that complements the filling. - 1/4 cup granulated sugar
The sugar helps to sweeten the crust and also the filling, balancing out the tartness of the apples in the recipe. - 1/2 cup unsalted butter, melted
Butter binds the crust ingredients together while adding richness and flavor, enhancing the overall taste of the mini cheesecakes. - 16 oz cream cheese, softened
The cream cheese is the star of the filling, providing a smooth and creamy texture that is essential for cheesecake. - 1/2 cup brown sugar
Brown sugar adds depth and a hint of caramel flavor to the cheesecake, reinforcing the overall theme of the dessert. - 2 large eggs
Eggs serve as a binding agent that helps the filling set while providing a silky texture. - 1 tsp vanilla extract
Vanilla enhances the flavors in the filling and adds a subtle aroma, making the cheesecake more aromatic and appealing. - 2 cups diced apples (about 2 medium apples)
The apples provide both flavor and texture, bringing freshness to the dessert and making it reminiscent of a classic apple crisp. - 1/2 tsp cinnamon
Cinnamon is a key spice that elevates the flavor profile, giving warmth and a slight spiciness that pairs perfectly with apples. - 1/4 cup caramel sauce (store-bought or homemade)
Caramel sauce adds sweetness and richness while providing a luscious topping that brings the entire dessert together. - 1/4 cup rolled oats
Oats add a chewy texture to the crisp topping, creating a contrast to the creamy cheesecake and enhancing the dessert's overall crunch. - 1/4 cup chopped nuts (optional)
Chopped nuts can provide an additional crunch and nutty flavor to the topping, creating a more complex texture.
Directions & Preparation
Step 1: Preheat your oven to 350°F (175°C)
Preheating the oven ensures that your mini cheesecakes bake evenly once placed inside. It's crucial for achieving the right texture and doneness. Make sure your oven reaches the desired temperature before you start baking to allow for even cooking.
Step 2: Prepare the crust by mixing crushed graham crackers, granulated sugar, and melted butter.
This step forms the base of your mini cheesecakes. Mixing the ingredients thoroughly ensures that the graham cracker crumbs bind well with the butter and sugar, creating a sturdy crust once baked. Aim for a consistency that holds together when pressed.
Step 3: Press the mixture into the bottom of a muffin tin lined with paper liners.
Evenly pressing the crust into the muffin tin helps to create a solid base that supports the creamy filling. Lining the tins with paper ensures that the cheesecakes release easily after baking, preventing any crumbling.
Step 4: In a mixing bowl, beat the softened cream cheese and brown sugar until smooth.
This step is vital for achieving a creamy texture in your cheesecake filling. Beating the ingredients together allows them to blend fully, eliminating any lumps, resulting in a velvety cheesecake base.
Step 5: Add in the eggs one at a time, followed by vanilla extract.
Incorporating eggs individually helps to maintain an even texture without overworking the batter. The eggs provide structure, while the vanilla extract adds a layer of flavor, enhancing the overall taste profile.
Step 6: Fold in the diced apples and cinnamon gently.
Folding in the apples ensures they are evenly distributed throughout the filling without breaking them down too much. This step is essential for keeping the filling chunky and flavorful, ensuring each bite includes tender apple pieces.
Step 7: Spoon the cheesecake filling into the muffin tin over the crust.
Spoon the mixture carefully to fill each muffin cup to about three-quarters full. This leaves room for the cheesecakes to rise slightly during baking. Ensure an even distribution for a consistent baking outcome.
Step 8: Bake for 20-25 minutes, or until the centers are set but slightly jiggly.
Baking the cheesecakes until they are just set helps avoid cracks in the tops. The slight jiggle indicates that they will firm up as they cool. Avoid overbaking, which can lead to a dry texture.
Step 9: Remove from the oven and let cool before chilling in the refrigerator for at least 2 hours.
Cooling the cheesecakes initially at room temperature helps them to set correctly. Chilling in the refrigerator deepens the flavors and firms up the texture, making for a more enjoyable eating experience.
Step 10: Top each mini cheesecake with caramel sauce, oats, and chopped nuts before serving.
Adding the toppings right before serving enhances the visual appeal and provides a delightful crunch. The warmth of the caramel sauce will contrast beautifully with the cold cheesecake, creating a memorable dessert.

Flavorful Apple Selection
Choosing the right apples is crucial for the success of your mini cheesecakes. Tart apples like Granny Smith balance the sweetness of the caramel and the sugar in the cheesecake. For a mellow flavor, try Honeycrisp or Fuji apples, which bring sweetness while still maintaining some tartness. Mixing different varieties can create a layered flavor profile that makes each bite interesting.
Transforming Leftovers into Treats
If you find yourself with leftover mini cheesecakes, consider transforming them into an exciting dessert. Crumble the cheesecakes and layer them with whipped cream and additional caramel sauce in a parfait glass for an eye-catching treat. This not only prevents waste but also introduces a fun twist to your leftovers, ideal for impressing guests.
Variations for Different Occasions
These mini cheesecakes are versatile and can be customized for various occasions. Try swapping the caramel sauce for a chocolate drizzle for a rich chocolate apple variation, or incorporate spices such as nutmeg and cloves for a seasonal twist. You can also make these cheesecakes into a larger version for a party, ensuring everyone can indulge in this delightful dessert.
FAQs
What should I do if my filling is too thick?
If your filling turns out too thick, you can add a tablespoon of milk or cream to achieve a smoother consistency before baking. This will ensure the filling bakes evenly and has a creamy texture.
How can I prevent my mini cheesecakes from cracking?
To avoid cracking, be careful not to overbeat the mixture and ensure you bake them at a lower temperature. Allow them to cool gradually in the oven with the door ajar to prevent shock.
Can I use a different type of topping for the mini cheesecakes?
Absolutely! Feel free to use whipped cream, chocolate ganache, or even a fruit compote as a topping instead of caramel sauce for a different flavor profile.
What if I want to adjust the sweetness of the filling?
You can modify the sweetness by reducing the amount of sugar in the filling and adjusting with a touch of honey or maple syrup if you'd like to maintain the flavor while balancing the sweetness.
Can I substitute the cream cheese with another ingredient?
If you’re looking for a lighter alternative, you can try using Greek yogurt, though the texture will be slightly different. Make sure it’s plain for the best results.
What if my apples are too soft in the mini cheesecakes?
If your apples get too soft during baking, consider using firmer varieties or ensuring the apple pieces are not too small, leaving some texture even after cooking.
How can I adjust the recipe for a larger crowd?
You can easily scale up the recipe by multiplying the ingredients for a larger batch. Use a bigger baking dish, like a 9×13 inch pan, and adjust the baking time accordingly, monitoring closely.
What should I do if my caramel sauce is too runny?
If the caramel sauce is too runny, allow it to cook longer on low heat, stirring until it thickens to your desired consistency. You can also cool it slightly to achieve a thicker texture.
Conclusion
These Caramel Apple Crisp Mini Cheesecakes combine the comforting flavors of autumn with the indulgence of cheesecake, creating a dessert that is sure to impress any gathering. Their layered texture and rich taste make them not only a delight to eat but also a joy to create.
So gather your ingredients and get ready to treat yourself and your loved ones to these delectable mini desserts. They are perfect for holidays, celebrations, or simply any day when you crave a sweet bite of perfection.
Recipe Card

Pesto Shrimp Linguine That Will Impress Your Guests
Ingredients
- 8 ounces linguine
- 1 pound shrimp peeled and deveined
- 1 cup fresh basil pesto
- 2 tablespoons olive oil
- 2 cloves garlic minced
- 1/2 teaspoon red pepper flakes
- Salt and pepper to taste
- Parmesan cheese for garnish
Instructions
- Cook the linguine according to package instructions.
- While the pasta cooks, heat olive oil in a large skillet.
- Add minced garlic and red pepper flakes to the skillet.
- Add the shrimp to the skillet and cook until they are pink and opaque.
- Drain the linguine and add it to the skillet with the shrimp.
- Stir in the pesto, mixing well to combine.
- Season with salt and pepper to taste and toss to combine.
- Serve immediately, garnished with Parmesan cheese.
Notes
Additional serving suggestions: pair with a crisp salad, garlic bread, or roasted seasonal vegetables for balance.
For make-ahead, prep components separately and assemble just before heating to preserve texture.
Taste and adjust with acid (lemon/vinegar) and salt right at the end to wake up flavors.


