
Introduction
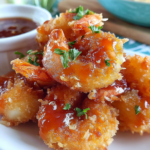
Coconut shrimp is a delightful blend of crunch and sweetness that transports your taste buds to a tropical paradise. This dish features succulent shrimp coated in a crispy coconut batter, perfectly complemented by a vibrant sweet chili sauce. It's not just a dish; it's an experience that adds joy to any meal.
Whether you're hosting a dinner party or enjoying a cozy night in, coconut shrimp makes for a wonderful appetizer or main course. The contrast of textures—the crunch of the coconut and the tender shrimp—combined with the tangy sweetness of the sauce is simply irresistible.
Ingredients
- 1 pound large shrimp, peeled and deveined
Large shrimp are ideal for this recipe as they provide a substantial bite and hold the coating well. Ensuring they're peeled and deveined saves time and makes for a more enjoyable eating experience. - 1 cup unsweetened shredded coconut
Shredded coconut adds a rich, nutty flavor and crispy texture to the shrimp. Using unsweetened coconut prevents the dish from becoming overly sweet and allows the natural flavors to shine. - 1/2 cup all-purpose flour
The flour acts as the first layer in the coating process, helping the egg wash adhere to the shrimp and creating a solid base for the coconut to cling to. - 2 large eggs, beaten
Beaten eggs serve as a binding agent, ensuring the coconut sticks well during frying. They add moisture and richness to the shrimp, enhancing the overall flavor. - 1/2 cup sweet chili sauce
The sweet chili sauce is the perfect dipping companion for coconut shrimp, providing a balance of sweetness and a hint of heat that elevates the dish. - Oil for frying
The choice of oil, usually vegetable or canola, is crucial for frying. It should have a high smoke point to achieve a crispy exterior without burning. - Salt and pepper, to taste
Seasoning the shrimp with salt and pepper highlights their natural sweetness and balances the flavors in the dish.
Directions & Preparation
Step 1: Prepare the shrimp
Rinse the shrimp under cold water and pat them dry with a paper towel. This step is important as excess moisture can prevent the coating from adhering properly during frying. Ensuring they are dry guarantees a crispy texture once cooked, enhancing the overall eating experience.
Step 2: Set up the breading station
In three separate shallow dishes, place the flour, beaten eggs, and shredded coconut. This setup allows for an efficient coating process. By assembling everything beforehand, you'll streamline the cooking process and minimize cleanup, making it easier to focus on achieving that perfect crispy exterior.
Step 3: Coat the shrimp
Dredge each shrimp in flour first, shaking off any excess. Then, dip it in the beaten eggs before coating it thoroughly with shredded coconut. This three-step process ensures that each shrimp is evenly covered and locked with flavor. Proper coating is key to achieving a crunchy texture that contrasts beautifully with the tender shrimp.
Step 4: Heat the oil
In a large skillet, heat oil over medium heat until shimmering. The correct temperature is vital for frying; too cool, and the shrimp will absorb excess oil, resulting in greasiness. Too hot, and the coconut will burn before the shrimp cook through. A good test is to drop a small piece of bread into the oil—if it bubbles and browns within 30 seconds, it's ready for frying.
Step 5: Fry the shrimp
Carefully add the shrimp to the hot oil in batches to avoid overcrowding, which can lower the oil temperature. Fry until golden brown on both sides, about 2-3 minutes each side. This step is crucial for achieving that desired crunch. Overcrowding can also lead to uneven cooking, so it's better to fry in smaller portions.
Step 6: Drain the shrimp
Once cooked, transfer the shrimp to a plate lined with paper towels to absorb excess oil. This helps maintain a crispy texture and avoids greasiness. Allow them to rest for a minute before serving; this gives the oil a chance to cool, ensuring your shrimp remain light and crispy.
Step 7: Serve with sweet chili sauce
Plate the shrimp and serve them warm alongside sweet chili sauce for dipping. This presentation not only looks appealing but allows diners to control their spice level. The combination of sweet and savory flavors makes for an irresistible pairing, perfect for any gathering.

The Importance of Fresh Shrimp
Using fresh shrimp significantly impacts the flavor and texture of your coconut shrimp. Fresh, high-quality shrimp will have a subtle sweetness and firm texture, enhancing the overall dish. When shopping, look for shrimp that are firm to the touch and have a slight ocean scent. Avoid any that smell overly fishy, as this indicates they are not fresh.
Choosing the Right Coconut
Selecting the appropriate coconut is essential for achieving the right flavor profile. Unsweetened shredded coconut is preferred as it offers the perfect balance of nuttiness without overwhelming sweetness. You can experiment with different textures as well, such as flaked or desiccated coconut, to discover your preferred crunch and flavor. This choice can elevate your dish unexpectedly.
Enhancing Your Sweet Chili Sauce
While store-bought sweet chili sauce is convenient, you can easily elevate it by adding a few extra ingredients. Consider mixing in some freshly squeezed lime juice for a zesty kick, or add a dash of sriracha for an extra layer of spice. Personalizing the dipping sauce not only enhances the flavor but also allows for creative expression in the kitchen.
FAQs
What if my shrimp are overcooked?
If the shrimp are overcooked, they may become rubbery and tough. To prevent this in the future, keep an eye on frying time and ensure you remove them as soon as they turn golden brown.
Can I scale this recipe for a larger crowd?
Absolutely! Simply multiply the ingredients by the number of servings you need. Pay attention to frying in batches to maintain oil temperature for the perfect crunch.
Why is my coconut coating coming off during frying?
This can happen if the shrimp are too wet or if the oil isn't hot enough. Ensure your shrimp are adequately dried before coating and fry in smaller batches.
Can I use frozen shrimp for this recipe?
Yes, but it’s essential to thaw them completely and dry them beforehand. This step prevents excess moisture from affecting the coating and frying process.
Is my sweet chili sauce too thick?
If the sauce turns out too thick, try mixing in a bit of water or lime juice to achieve your desired consistency without losing flavor.
How can I enhance the flavor of my shrimp coating?
Consider adding spices like garlic powder, paprika, or cayenne pepper to the flour mix. This addition will give your shrimp a unique flavor that complements the sweetness of the coconut.
Conclusion
Coconut shrimp with sweet chili sauce is a delightful dish that elevates any dining occasion. The combination of the crispy coating and the sweet, spicy dip creates an unforgettable experience.
Whether enjoyed as an appetizer or main dish, this recipe allows both novice and experienced cooks to create a flavorful meal that brings a taste of the tropics to the table.
Recipe Card
Delicious Coconut Shrimp with Sweet Chili Sauce
Ingredients
- 1 pound large shrimp peeled and deveined
- 1 cup unsweetened shredded coconut
- 1/2 cup all-purpose flour
- 2 large eggs beaten
- 1/2 cup sweet chili sauce
- Oil for frying
- Salt and pepper to taste
Instructions
- Prepare the shrimp
- Set up the breading station
- Coat the shrimp
- Heat the oil
- Fry the shrimp
- Drain the shrimp
- Serve with sweet chili sauce
Notes
Additional serving suggestions: pair with a crisp salad, garlic bread, or roasted seasonal vegetables for balance.
For make-ahead, prep components separately and assemble just before heating to preserve texture.
Taste and adjust with acid (lemon/vinegar) and salt right at the end to wake up flavors.


