Introduction
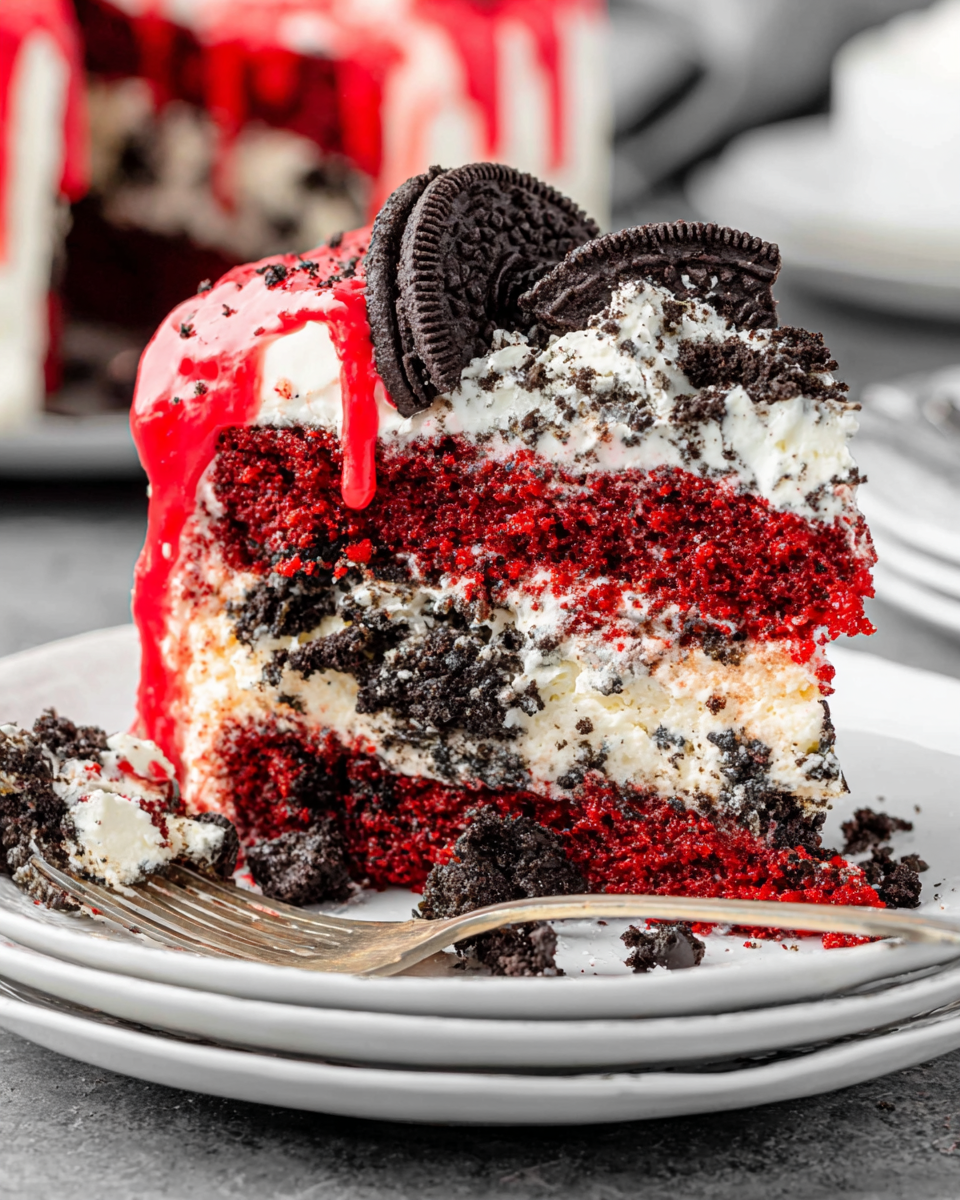
Indulging in a dessert that feels like an event is an experience every home cook should embrace. The Oreo Red Velvet Cheesecake Drip Cake is not just a feast for the eyes; it's a rich, layered delight that will satisfy the most discerning sweet tooth.
This cake combines the classic flavors of red velvet, rich cheesecake, and crunchy Oreo layers, all topped with a luscious chocolate drip. Perfect for celebrations or just because, it will amaze your friends and family alike with its decadent presentation and equally indulgent taste.
Ingredients
- 2 cups all-purpose flour
Flour forms the backbone of the cake, providing structure and texture. All-purpose flour strikes a balance, giving a soft crumb while maintaining enough strength to support the layers. - 1 ½ cups granulated sugar
Sugar not only sweetens the cake but also helps create a moist texture by retaining moisture. Additionally, it aids in browning, contributing to a beautiful color. - 1 teaspoon baking powder
Baking powder acts as a leavening agent, giving the cake its light and airy texture by producing gas bubbles during baking, helping it rise. - 1 teaspoon baking soda
Baking soda helps the cake rise and also balances the acidity of the buttermilk, contributing to the overall lightness of the cake. - 1 teaspoon salt
Salt enhances flavor and balances the sweetness of the cake, ensuring that every bite is delicious without being overwhelming. - 1 cup vegetable oil
Oil adds moisture and richness to the cake, resulting in a tender crumb. It also helps the cake stay soft and fresh for longer. - 1 cup buttermilk
Buttermilk adds a tangy flavor and reacts with the baking soda, helping with the leavening process while keeping the cake moist. - 2 large eggs
Eggs provide structure and stability to the cake, as well as richness. They contribute to the flavor and the rise, helping the cake maintain its density. - 2 tablespoons cocoa powder
Cocoa powder adds depth and subtle chocolate flavor to the red velvet mix, enhancing the overall taste profile of this luxurious cake. - 1 teaspoon vanilla extract
Vanilla extract amplifies the flavors in the cake, adding a warm and comforting note that brightens the sweetness. - 1 ½ cups cream cheese
Cream cheese is the star of the cheesecake layer, providing a creamy texture and tangy flavor that pairs beautifully with the sweetness of the cake. - ½ cup powdered sugar
Powdered sugar sweetens the cheesecake filling while ensuring a smooth texture without any grit that granulated sugar might leave. - 1 cup heavy cream
Heavy cream is whipped to create a light and airy frosting. Its richness balances and complements the sweetness of the cake and cheesecake. - 1 tablespoon cocoa powder (for decoration)
This dusting of cocoa powder adds visual appeal and a hint of chocolate flavor on top, enhancing the presentation of the cake. - Oreo cookies (for decoration)
Crushed Oreos not only add a delightful crunch to the cake but also enhance the flavor profile with their chocolate and cream filling. - 1 cup chocolate ganache
The chocolate ganache provides a glossy finish that brings a luxurious touch to the cake while adding rich chocolate flavor.
Directions & Preparation
Step 1: Preheat your oven to 350°F (175°C).
Preheating the oven ensures that the cake bakes evenly right from the start. If the oven is not at the right temperature, the cake may not rise as intended, leading to a denser texture.
Step 2: Grease and flour two 9-inch round cake pans.
Properly greasing and flouring pans is crucial to ensure the cakes release easily after baking. This will prevent the cake from sticking, which can ruin the beautiful layers.
Step 3: In a large mixing bowl, combine flour, sugar, baking powder, baking soda, salt, and cocoa powder.
Mixing the dry ingredients thoroughly allows for even distribution of the leavening agents and flavors, ensuring a uniform texture throughout the cake.
Step 4: In a separate bowl, whisk together oil, buttermilk, eggs, and vanilla extract.
Whisking these wet ingredients together ensures they are well combined, which is essential for achieving a moist and flavorful cake.
Step 5: Gradually add the wet mixture to the dry ingredients, mixing until just combined.
Over-mixing can lead to a tough cake, so mixing just until combined helps keep the texture light and airy. Take care not to leave flour pockets, but stop as soon as you don't see dry ingredients.
Step 6: Divide the batter between the prepared pans and smooth the tops.
Dividing the batter equally helps the cakes rise and bake evenly. Smoothing the tops ensures an aesthetically pleasing final result without domed tops.
Step 7: Bake for 25-30 minutes, or until a toothpick inserted in the center comes out clean.
Baking time is critical—too long, and the cakes will dry out; too short, and they will collapse. The toothpick test is a reliable method to check for doneness.
Step 8: Allow the cakes to cool in the pans for 10 minutes, then turn out onto wire racks to cool completely.
Cooling in the pans reduces the risk of breaking apart when transferring. Cooling completely is essential before frosting, as warm cake can cause frosting to melt.
Step 9: While the cakes are cooling, prepare the cheesecake filling by beating cream cheese and powdered sugar until smooth.
Beating the cream cheese ensures a lump-free filling. The sugar balances the tanginess while helping the filling hold its shape when chilled.
Step 10: In a separate bowl, whip the heavy cream until stiff peaks form, then fold into the cream cheese mixture.
Whipping the heavy cream to stiff peaks ensures that the cheesecake filling is light and airy. Folding in the whipped cream gently preserves the volume to create a luscious texture.
Step 11: Place one layer of cake on a serving platter and spread half of the cheesecake filling on top.
Layering the cheesecake filling adds richness to the cake, and spreading evenly ensures that every slice has a balanced amount of filling.
Step 12: Top with the second cake layer and repeat with the remaining cheesecake filling.
This approach creates a delightful surprise of creamy cheesecake between the red velvet layers, providing a generous and indulgent bite.
Step 13: Refrigerate the assembled cake for at least 2 hours to firm up the filling.
Chilling the cake allows the layers to set properly, making it easier to cut clean slices and ensuring the filling holds its shape.
Step 14: Prepare the chocolate ganache by heating heavy cream and pouring it over chopped chocolate, stirring until smooth.
This technique of making ganache creates a shine and rich flavor that perfectly complements the sweetness of the cake, resulting in a luxurious finish.
Step 15: Pour the ganache over the chilled cake, allowing it to drip down the sides for an appealing look.
Dripping the ganache creates a visually stunning effect, adding to the dessert's indulgence. Make sure to do this carefully; practice will give the best results.
Step 16: Decorate the top with crushed Oreo cookies and dust with cocoa powder.
These finishing touches not only elevate the presentation but also add textures and complementary flavors that enhance the overall indulgence of the cake.
Step 17: Slice and serve the cake after allowing it to set for an additional 30 minutes if desired.
Letting the cake sit allows the ganache to set further, making it easier to slice. The flavors also meld together, creating a more harmonious taste experience.

The Art of Layering a Cake
Layering is an essential technique in cake-making that provides not only visual appeal but also enhances flavor interactions. By adding filling like cheesecake between layers, you create an engaging experience in each slice. Each layer should be balanced in height and filling, ensuring a symmetrical look, which is both striking and delicious.
Creating the Perfect Chocolate Ganache
Ganache is a luxurious addition that transforms cakes into decadent masterpieces. The key to achieving a glossy and smooth ganache lies in proper temperature control when heating the cream. It should be hot but not boiling; this helps melt the chocolate evenly, creating a rich, pourable sauce that enhances the cake's overall flavor and presentation.
Decorating Your Drip Cake Like a Pro
Decorating is where your creativity can truly shine. Utilizing ingredients like crushed Oreos not only adds texture and flavor but also personalizes the presentation. The goal is to create a vibrant cake that reflects the indulgent flavor profile while making an impressive statement that resonates with the occasion. Remember, simplicity can be just as effective as elaborate designs.
FAQs
What should I do if my ganache is too thick to pour?
If your ganache is too thick, try warming it slightly in a microwave or over a double boiler until it reaches your desired pouring consistency.
How can I ensure my cheesecake layer doesn't melt when frosting?
Chilling the cheesecake layer before adding the ganache helps firm it up, ensuring it holds its shape even as you pour warm ganache over it.
Can I use cream cheese frosting instead of cheesecake filling?
Yes, if you prefer a cream cheese frosting, it can replace the cheesecake layer for a similar flavor profile with a different texture.
What if my red velvet cake layers are drier than expected?
If your cake layers turn out dry, consider adjusting the baking time next time or increasing the oil to enhance moisture.
How can I make a taller drip cake?
To create a taller cake, simply add more layers or use taller cake pans. Ensure even baking times for each layer to maintain balance.
What if my cheesecake filling is too runny?
If the filling is too runny, chill it for a bit longer to help it set. If you’re incorporating too much liquid, reduce the cream slightly.
Conclusion
The Oreo Red Velvet Cheesecake Drip Cake is the epitome of indulgence, perfect for those special moments that call for something extraordinarily delicious. Every bite offers a blend of textures—from the moist cake to the creamy filling, each layer invites you to savor the experience.
Baking this cake is not only about following a recipe; it’s about celebrating creativity and flavor. Don’t hesitate to make it your own by experimenting with different flavors or decorations. Happy baking, and enjoy this remarkable dessert!
Recipe Card
Comforting Butternut Squash Pasta with Sausage and Spinach
Ingredients
- 12 oz pasta penne or fettuccine
- 1 lb Italian sausage casings removed
- 2 cups butternut squash peeled and cubed
- 3 cups fresh spinach
- 1 small onion diced
- 3 cloves garlic minced
- 1/2 cup heavy cream
- 1/2 teaspoon nutmeg
- Salt and pepper to taste
- Olive oil for sautéing
Instructions
- Cook the pasta according to package instructions.
- Sauté the onion and garlic in olive oil.
- Add the sausage to the skillet and cook until browned.
- Incorporate the butternut squash.
- Pour in the heavy cream and season.
- Add the spinach and cooked pasta.
- Serve hot and enjoy.
Notes
Additional serving suggestions: pair with a crisp salad, garlic bread, or roasted seasonal vegetables for balance.
For make-ahead, prep components separately and assemble just before heating to preserve texture.
Taste and adjust with acid (lemon/vinegar) and salt right at the end to wake up flavors.


