Introduction
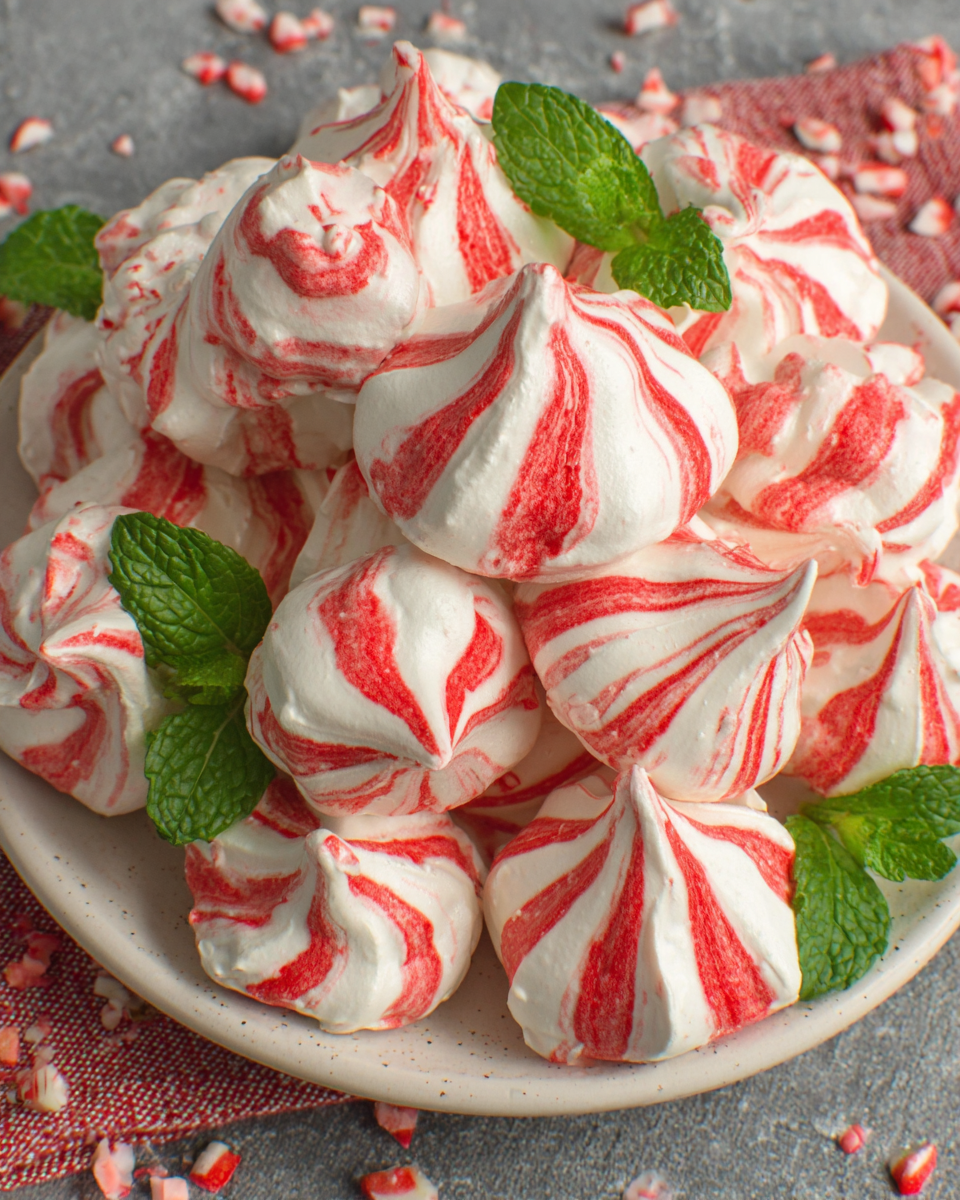
As the holiday season approaches, the kitchen becomes a hub of creativity and joy. One delightful treat to add to your repertoire is peppermint meringues, a light and airy confection that embodies the festive spirit. These meringues are not just visually appealing; their melt-in-your-mouth texture and refreshing peppermint flavor make them a standout dessert.
Made from simple ingredients, peppermint meringues require only a little time and patience, but the rewarding result is worth every moment. Perfect for sharing at holiday gatherings, they bring a cheerful touch to any dessert table, making them not just a treat, but a delightful experience.
Ingredients

- 3 large egg whites
Egg whites serve as the base for meringues, providing structure and volume when whipped. They form a stable foam that helps encapsulate air, giving the meringues their light texture. - 1 cup granulated sugar
Sugar not only sweetens the meringues but also helps stabilize the egg whites as they whip, preventing them from deflating. It creates a glossy finish and enhances the overall texture. - 1/2 teaspoon cream of tartar
Cream of tartar is an acid that helps stabilize the egg whites during whipping. It aids in achieving a firm and airy texture, ensuring that the final meringue holds its shape. - 1 teaspoon pure peppermint extract
Peppermint extract adds a refreshing flavor to the meringues, making them distinctively festive. It infuses the meringues with a delightful peppermint aroma that captures the essence of the holiday season. - Red gel food coloring (optional)
Food coloring allows you to create visually striking meringues. A few drops of red gel will give the meringues a festive tint without altering the flavor or texture.
Directions & Preparation
Step 1: Preheat your oven to 200°F (93°C).
Starting with a preheated oven is crucial for meringues as low temperatures allow the meringues to dry out gradually rather than bake too quickly. This gentle heat ensures they form a crisp outer shell while remaining soft inside.
Step 2: Prepare your baking sheets with parchment paper.
Lining the baking sheets with parchment prevents the meringues from sticking, allowing for easy removal once they are baked. It also helps maintain their shape, promoting uniformity in size and appearance.
Step 3: In a mixing bowl, combine egg whites and cream of tartar.
Whipping the egg whites with cream of tartar from the start strengthens the meringue’s structure. This combination creates a stable base that will successfully trap air, resulting in light and fluffy meringues.
Step 4: Beat the egg whites on medium speed until foamy.
At this stage, you’re looking for soft peaks to start forming. This means that the eggs are beginning to aerate, and small bubbles should be visible. Patience is key as it sets the foundation for the final texture.
Step 5: Gradually add the granulated sugar, one tablespoon at a time, while continuing to beat.
Adding sugar slowly is essential; it allows the sugar to dissolve properly in the egg whites, giving the meringues their signature glossy finish. This phase requires continuous mixing to ensure a stable and thick meringue.
Step 6: Increase the speed to high and beat until stiff peaks form.
Stiff peaks mean that the meringue has reached maximum volume and can hold its shape. This is the ideal consistency for strong meringues. You’ll know it’s ready when you can turn the bowl upside down, and the mixture remains in place.
Step 7: Mix in the peppermint extract and food coloring if desired.
Incorporating the peppermint extract at this stage enhances the flavor of the meringues. Adding food coloring will create an elegant look for your treats; gently fold it in to achieve a marbled effect without deflating the mixture.
Step 8: Spoon or pipe the meringue onto the prepared parchment sheets.
Using a piping bag provides the option to create uniform shapes that are not just delicious but visually appealing. If you’re spooning, keep them similar in size to ensure even baking.
Step 9: Bake in the preheated oven for 1 to 1.5 hours until dry.
Baking at a low temperature is vital for drying out the meringues without browning them. They should feel crisp and not sticky when removed from the oven. If they seem soft, allow more baking time.
Step 10: Turn off the oven and let the meringues cool inside with the door ajar.
This step allows gradual cooling, helping to maintain the crunchy texture without cracking. The residual heat in the oven continues to dehydrate the meringues, creating a delightful melt-in-your-mouth quality.
Step 11: Once cool, store the meringues in an airtight container.
Proper storage is critical to maintain the texture of the meringues. Storing them in an airtight container prevents moisture from making them chewy. Enjoy them within a couple of weeks for optimal freshness.
Crafting the Perfect Meringue
Achieving light and airy meringues relies on several critical factors. First, ensure that your mixing bowl and utensils are clean and free from any grease. The presence of fat can hinder the whipping process. Secondly, egg whites must be at room temperature for optimal volume—this helps them whip better than cold whites. Finally, patience is key; rush the process, and you’ll sacrifice texture.
Adding a Festive Twist
To make your peppermint meringues extra festive, consider garnishing them with crushed candy canes or drizzling melted chocolate on top. These additions provide a delightful contrast in texture and flavor. Furthermore, serving meringues in decorative holiday boxes makes for delightful gifts, sharing the joy of your baking with friends and family.
Experimenting with Flavors
While peppermint is perfectly festive for the holidays, don’t hesitate to experiment with other flavors as well. Almond or vanilla extract can create delightful variations, and citrus zest can brighten the flavors. Play with different extracts and toppings to find your favorite combinations. This versatility ensures that meringues can be enjoyed year-round!
FAQs
What should I do if my meringue is too runny?
If your meringue is runny, it may not have been whipped enough. Continue beating the egg whites until they reach stiff peaks.
Can I make these meringues smaller or larger?
Yes, you can adjust the size of the meringues. Just keep in mind that smaller meringues will bake faster, so adjust the baking time accordingly.
What happens if my meringue is too dry?
Overbaking can lead to overly dry meringues. If they crumble easily or are too hard, consider reducing the baking time next time.
Can I replace peppermint extract with another flavor?
Absolutely! Feel free to experiment with other extracts like vanilla, almond, or even lemon for a different twist, just be mindful of the quantity.
How can I ensure my meringues have a nice glossy finish?
Ensure that your mixing bowl and utensils are clean and free of any grease. Beating the sugar into the egg whites gradually also helps achieve that glossy texture.
What should I do if my meringue starts to deflate?
If your meringue starts to deflate after mixing, check if it was beaten sufficiently or if any fat came into contact with the mixture, as this can cause deflation.
Conclusion
Peppermint meringues are a delightful addition to any holiday spread, bringing joy not only through their taste but also through their whimsical appearance. The combination of lightness and festive flavor surely captivates the hearts and palates of everyone who tries them.
As you perfect this recipe, remember that the holiday spirit is all about creativity and joy in sharing. Whether you enjoy them during cozy gatherings or offer them as sweet gifts, peppermint meringues are sure to bring smiles this season.
Notes
Additional serving suggestions: pair with a crisp salad, garlic bread, or roasted seasonal vegetables for balance.
For make-ahead, prep components separately and assemble just before heating to preserve texture.
Taste and adjust with acid (lemon/vinegar) and salt right at the end to wake up flavors.


