Introduction
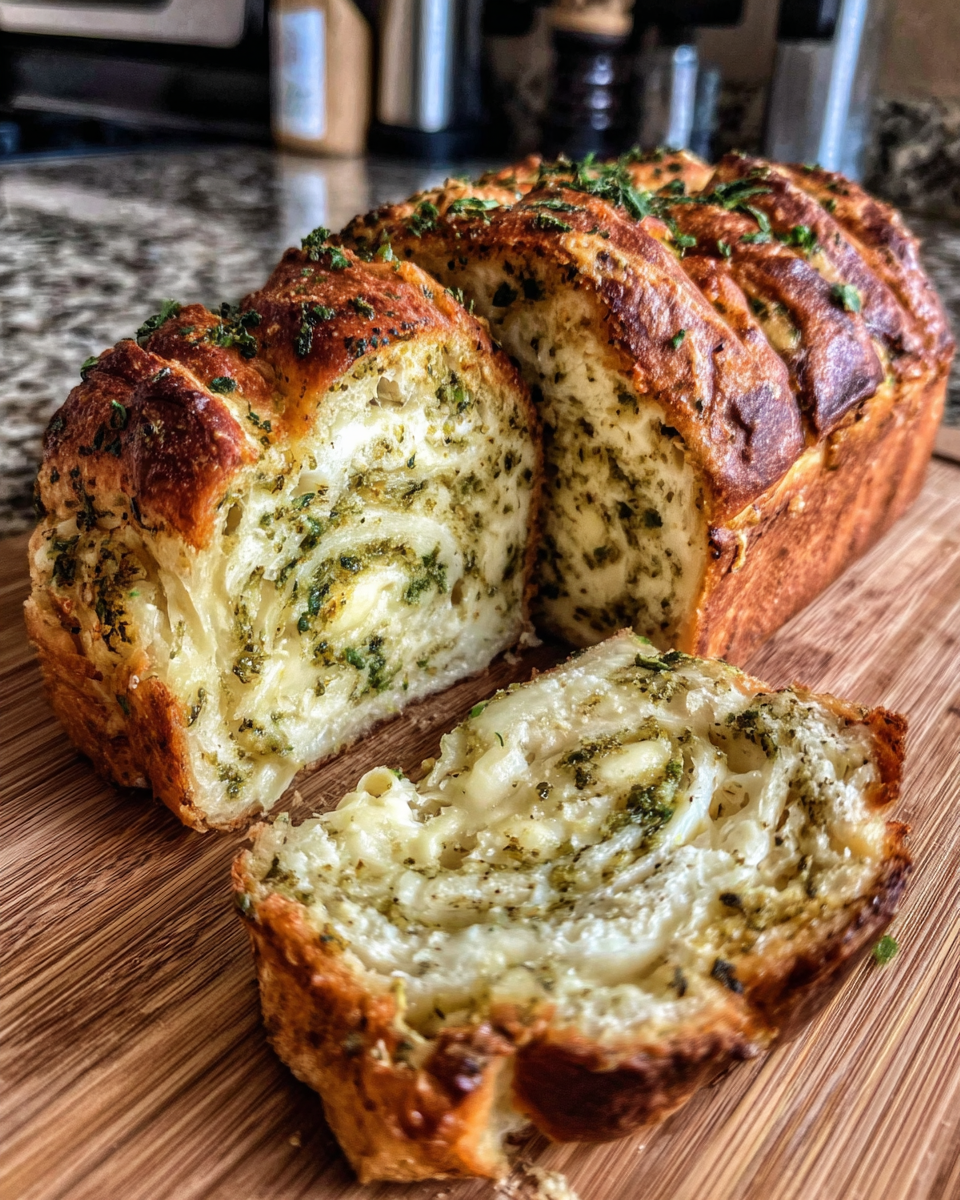
Baking bread at home can evoke a sense of comfort and satisfaction, particularly when it results in a loaf that fills the air with tantalizing aromas. Among the most delightful of these homemade creations is the swirled garlic herb and cheese bread. This bread not only boasts a stunning presentation, with its winding ribbons of garlic and herbs, but it also delivers a flavorful punch that is simply irresistible.
Each slice reveals savory garlic, fragrant herbs, and melty cheese, making it an excellent accompaniment to soups, salads, or enjoyed on its own. Baking this bread may initially seem challenging, yet with a little patience and practice, you can master it right in your kitchen. Embrace the art of bread-making with this recipe that turns simple ingredients into a culinary masterpiece.
Ingredients
- 4 cups all-purpose flour
The backbone of your bread, all-purpose flour provides the necessary structure while allowing the loaf to rise beautifully. It contains a moderate amount of protein, contributing to a chewy texture. - 1 packet (2 1/4 tsp) active dry yeast
Yeast is the life of the bread, responsible for fermentation and fermentation releases carbon dioxide, which will cause the dough to rise. It also develops flavor during the rising process. - 1 1/2 cups warm water
Warm water activates the yeast and helps hydrate the flour, ensuring the dough can develop properly. The right temperature is crucial; too hot may kill the yeast, and too cold may slow the activation. - 2 tbsp sugar
Sugar feeds the yeast, enhancing its activity and contributing to a finer crumb in the bread. A hint of sweetness also balances the flavors found in the savory additions. - 2 tsp salt
Salt is essential for flavor and it strengthens the gluten structure. It also regulates yeast activity, ensuring a steady rise without overwhelming the dough. - 1/3 cup olive oil
Olive oil enriches the dough, providing moisture and tenderness while infusing a subtle richness and enhancing the flavor of the bread. It contributes to a slightly crisp crust. - 1 cup shredded cheese (such as mozzarella or cheddar)
Adding cheese not only provides a delicious flavor and creaminess but also contributes to the richness of the bread. As it melts, it creates those luscious cheese pockets. - 1/4 cup minced fresh herbs (parsley, rosemary, or thyme)
Fresh herbs enhance the aroma and flavor profile of the bread, giving it a vibrant touch. Their oils are released during baking, infusing the loaf with aromatic notes. - 4 cloves garlic, minced
Garlic offers a robust, fragrant foundation, providing that signature savoriness. When infused into the dough, it melds beautifully with the cheese and herbs, creating complex layers of flavor.
Directions & Preparation
Step 1: Activate the yeast.
Begin by combining warm water, sugar, and yeast in a small bowl. Let this mixture sit for about 10 minutes until foamy. This proofing step is essential; it demonstrates that your yeast is alive and ready to work. If there’s no foam after this period, the yeast may not be viable, and it’s best to start fresh.
Step 2: Mix the dry ingredients.
In a large mixing bowl, whisk together the flour and salt until well combined. This ensures even distribution of the salt, which is crucial for optimal flavor and yeast regulation. Gradually incorporating dry with wet ingredients avoids clumping and results in a smooth dough.
Step 3: Combine wet and dry ingredients.
Once your yeast is activated, pour it into the flour mixture along with olive oil. Stir until the dough begins to come together. At this juncture, the dough should be somewhat shaggy, indicating that the flour is absorbing the liquid. Resist the urge to add too much flour; you want a slightly sticky dough that will knead well.
Step 4: Knead the dough.
Transfer the dough onto a lightly floured surface and knead for about 8-10 minutes until it is smooth and elastic. Kneading is vital as it develops the gluten, which gives the bread its structure and chew. As you knead, use the heel of your hand to push the dough away, fold it back over itself, and repeat.
Step 5: First rise.
Place the kneaded dough in a lightly greased bowl, cover it with a damp towel, and let it rise in a warm place for about an hour, or until it doubles in size. This fermentation period is when flavor develops, and the gluten network strengthens, resulting in a lighter loaf.
Step 6: Prepare the filling.
While the dough rises, mix minced garlic, herbs, and cheese in a separate bowl. This filling will provide the delightful swirls and enhance the flavor profile of the bread. Ensuring even distribution of ingredients will allow every bite to be bursting with savory goodness.
Step 7: Shape the dough.
After the first rise, punch down the dough to release air bubbles and transfer it to your work surface. Roll it out into a rectangle about half an inch thick. This shaping step is crucial; it creates a canvas for your filling and allows for a uniform baking process.
Step 8: Add the filling.
Spread the cheese, garlic, and herb mixture evenly over the rolled-out dough, leaving a small border around the edges. Press gently to incorporate the filling into the dough; this action ensures that the filling adheres well and doesn’t spill out while baking, preventing a mess.
Step 9: Roll and shape.
Roll the dough tightly from one end to the other to form a log, then pinch the seams to seal. This step creates those beautiful swirls; the tighter you roll, the more defined the spirals will be. Moreover, pinching the seams helps contain the filling, ensuring it doesn’t escape during baking.
Step 10: Second rise.
Place the rolled dough seam-side down in a greased loaf pan. Cover it again and let it rise for about 30 minutes until puffy. This second rise allows the dough to expand fully, and the additional fermentation contributes to the depth of flavor in your finished loaf.
Step 11: Preheat the oven.
Preheat your oven to 375°F (190°C) during the last 10 minutes of the second rise. Having your oven at the right temperature ensures that the bread bakes evenly and achieves that perfect golden crust at the correct time.
Step 12: Bake the bread.
Bake the loaf in the preheated oven for 30-35 minutes or until it is golden brown and sounds hollow when tapped. This step is critical for achieving that desirable crust and a fully cooked inside. Baking until the crust is darkened ensures flavor development and helps improve shelf-life.
Step 13: Cool and serve.
Once baked, remove the bread from the oven and let it cool in the pan for 10 minutes before transferring it to a wire rack. Allowing the loaf to cool properly is essential; cutting it too soon may result in a gummy texture. The cooling process also allows flavors to meld, enhancing the overall taste.

The Significance of Garlic and Herbs
Garlic and fresh herbs are not merely additional flavorings; they play a crucial role in elevating the overall taste profile of the bread. Garlic provides a savory depth, while herbs introduce aromatic nuances that awaken the senses. This combination creates a well-rounded taste experience, ensuring that every bite is filled with robust flavor.
Choosing the Right Cheese
When selecting cheese for this bread, it's important to consider melting qualities. Cheeses like mozzarella and cheddar are ideal as they not only melt beautifully but also offer distinct flavor profiles. Combining different cheeses can add complexity; for example, mixing a sharp cheddar with mild mozzarella balances taste while also contributing to that luxurious gooey texture.
Perfect Pairings for Serving
Swirled garlic herb and cheese bread pairs beautifully with a variety of dishes. Consider serving it alongside a rich tomato soup or a fresh green salad for a delightful contrast in texture and flavor. It also makes a fantastic accompaniment to themed meals, adding a distinct flair to charcuterie boards, dips, or as a stand-alone snack with olive oil for dipping.
FAQs
What should I do if my dough is too sticky?
If your dough is excessively sticky, sprinkle in small amounts of flour while kneading until you achieve a manageable consistency. Avoid adding too much at once to prevent a dense loaf.
Can I increase the amount of cheese used?
Yes, you can increase the cheese quantity for a cheesier flavor. Just ensure it is evenly distributed to prevent it from spilling out during baking.
What if my bread comes out too dense?
A dense loaf may result from under-kneading or insufficient rising time. Ensure you knead until the dough is elastic and allow it to rise until it doubles in size for the best texture.
How can I make my bread more garlicky?
To enhance the garlic flavor, you can lightly sauté the minced garlic in olive oil before adding it to the filling. This method mellows the raw taste and deepens the aroma.
Is it possible to add additional vegetables?
Absolutely! Adding finely chopped vegetables like spinach or sun-dried tomatoes to the filling can enhance flavor and nutrition, but make sure they are not too watery to prevent sogginess.
What should I do if my cheese starts to leak during baking?
To minimize leaking cheese, ensure that you’ve sealed the edges of the dough well after rolling. If leakage occurs, keep your oven clean by placing a baking sheet beneath the bread to catch drips.
Can I use dried herbs instead of fresh?
Yes, you can substitute dried herbs for fresh ones, but use them sparingly, as they tend to be more concentrated in flavor. Adjust the amount according to your taste preference.
How can I tell if my bread is fully baked?
A correctly baked loaf will be golden brown and sound hollow when tapped on the bottom. Additionally, using an internal thermometer, the bread should reach about 190°F (88°C) for perfect doneness.
Conclusion
Baking swirled garlic herb and cheese bread at home is a rewarding venture that can transform a simple gathering into a cherished occasion. The combination of aromas wafting through your kitchen and the sight of a golden, rustic loaf is sure to impress both family and friends.
With a bit of patience and practice, you’ll find that you can create this delicious, savory bread with ease. So, roll up your sleeves, enjoy the process, and savor every bite of your freshly baked creation.
Recipe Card
Creamy Cheesy Garlic Scalloped Potatoes Recipe
Ingredients
- 2 lbs russet potatoes
- 2 cups heavy cream
- 4 cloves garlic minced
- 2 cups shredded sharp cheddar cheese
- 1 cup grated Parmesan cheese
- 1 teaspoon salt
- 1/2 teaspoon black pepper
- 1/4 teaspoon nutmeg
- 2 tablespoons fresh parsley chopped
Instructions
- Preheat your oven to 375°F (190°C).
- Prepare the baking dish by greasing it with butter or cooking spray.
- Thinly slice the russet potatoes using a mandoline or sharp knife.
- In a saucepan, combine heavy cream, minced garlic, salt, pepper, and nutmeg. Heat over medium heat until warmed.
- Layer half of the sliced potatoes in the greased baking dish.
- Pour half of the warm cream mixture over the first layer of potatoes.
- Sprinkle half of the cheddar and Parmesan cheese over the cream-covered potatoes.
- Repeat the layering process with the remaining potatoes, cream mixture, and cheeses.
- Cover the baking dish with aluminum foil and bake for 45 minutes.
- Remove the foil and bake for an additional 30 minutes or until the top is golden and bubbly.
- Let the dish rest for 10 minutes before serving, garnished with fresh parsley.
Notes
Additional serving suggestions: pair with a crisp salad, garlic bread, or roasted seasonal vegetables for balance.
For make-ahead, prep components separately and assemble just before heating to preserve texture.
Taste and adjust with acid (lemon/vinegar) and salt right at the end to wake up flavors.


