Introduction
Creating a homemade ice cream cake can be one of the most fulfilling culinary experiences for any home cook. Combating the heat of summer or celebrating a special occasion with this indulgent dessert makes for a memorable treat, combining layers of rich cake, creamy ice cream, and delicious toppings.
Unlike store-bought options that often focus on convenience over quality, this homemade version allows you to control the ingredients and customize flavors to suit your preference. The following recipe will guide you through a process that might seem intricate, but it’s fundamentally straightforward and absolutely rewarding.
Ingredients
- 2 cups all-purpose flour
Flour acts as the structure-building ingredient that gives the cake its body and texture. It provides the necessary gluten, which helps the cake rise and keeps it moist. - 1 cup granulated sugar
Sugar sweetens the cake while also affecting its texture. It contributes to the cake's moisture and can help create a tender crumb, balancing well with the creaminess of the ice cream. - 1/2 cup unsweetened cocoa powder
If using chocolate cake, cocoa powder brings in rich chocolate flavor. It not only adds color but also enhances the overall taste profile of the cake, providing a nice contrast to the cold ice cream. - 1/2 cup unsalted butter, softened
Butter adds moisture and richness to the cake. It helps create a fine crumb and contributes to a satisfying mouthfeel, making your cake decadent. - 2 large eggs
Eggs act as a binding agent, helping to hold the ingredients together. They also add moisture and richness, contributing to the cake’s overall texture. - 1 cup whole milk
Milk provides moisture to the cake and enhances its flavor. The fat content helps in achieving a tender crumb, allowing the cake to pair beautifully with the ice cream. - 2 teaspoons baking powder
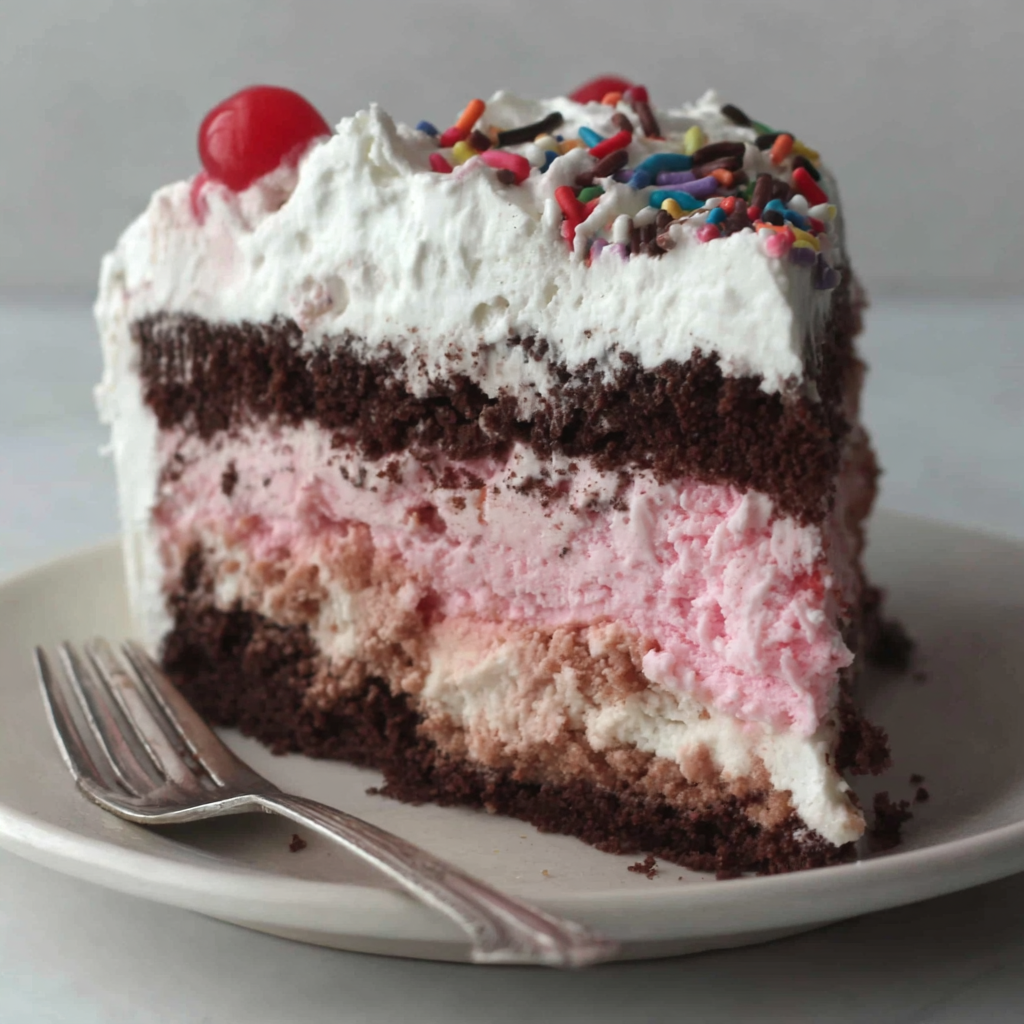
Baking powder acts as a leavening agent, helping the cake rise while baking. It ensures a light, airy texture essential for a delicious cake. - 4 cups ice cream (any flavor, softened)
The star of the cake—ice cream adds a creamy, indulgent layer that contrasts beautifully with the cake layers. Softening it allows for easier spreading, ensuring a smooth texture. - 1 cup whipped cream
Whipped cream serves as both a decorative topping and an additional layer of creamy texture. Its lightness helps balance the denser cake and ice cream. - Chocolate or caramel sauce (for drizzling)
These sauces add an extra layer of flavor and can enhance presentation. They provide a beautiful finish to the cake and can be drizzled either between layers or on top.
Directions & Preparation
Step 1: Preheat the oven to 350°F (175°C).
Preheating the oven is crucial for baking success. Starting to bake cakes in a preheated oven ensures that they rise properly and develop a good structure. An oven thermometer can be helpful to confirm accurate temperature.
Step 2: Grease and flour two 9-inch round cake pans.
Greasing and flouring the pans prevents the cake from sticking, making it easier to release once baked. This step is vital for achieving clean, perfect cake layers and avoiding any disaster when it’s time to assemble.
Step 3: In a large bowl, combine flour, sugar, cocoa powder, and baking powder.
Mixing the dry ingredients before adding wet ones helps ensure even distribution of those elements throughout the cake batter. This step optimizes the texture and flavor, avoiding pockets of ingredients in the finished cake.
Step 4: In another bowl, cream the butter and sugar until light and fluffy.
Creaming the butter and sugar creates air pockets that help the cake rise. The texture is essential for a moist, fluffy cake, so take time to do this step well,
Step 5: Add the eggs, one at a time, mixing well after each addition.
Incorporating eggs one at a time allows each egg to fully emulsify into the butter-sugar mixture, contributing to the overall structure of the cake. This leads to a uniform texture and better volume.
Step 6: Gradually add the dry ingredient mixture and milk, alternating between the two.
Alternating between dry ingredients and milk helps prevent the batter from becoming over-mixed, which can lead to a tough texture. This method also assures that everything is incorporated evenly.
Step 7: Pour the batter evenly into the prepared cake pans and smooth the tops.
Even distribution of batter into pans is vital for uniform baking. Use a spatula to ensure the tops are smooth, which helps during assembly for better layering and presentation.
Step 8: Bake for 25-30 minutes or until a toothpick inserted comes out clean.
Baking times can vary, so checking a few minutes before the expected time can prevent over-baking. A toothpick test is reliable; it should come out clean with no streaks of batter.
Step 9: Let the cakes cool in the pans for 10 minutes before transferring to wire racks.
Allowing the cakes to cool in the pans helps them firm up without breaking. Transferring to wire racks allows air to circulate around the cake, preventing sogginess.
Step 10: Once completely cool, level the tops of the cakes if needed.
Leveling ensures each layer is flat, allowing for even stacking and a professional-looking cake. Uneven layers can lead to tilting and uneven icing.
Step 11: Spread a layer of softened ice cream on top of one cake layer.
This step creates a delicious contrast between the cake and creamy ice cream. Make sure the ice cream is softened enough for easy spreading, and try to keep it within the edges to avoid overflow.
Step 12: Place the second cake layer on top of the ice cream, then freeze for at least 2 hours.
Stacking the cake layers helps the ice cream set between them, so freezing is crucial. It solidifies the layers, making it easier to slice once assembled.
Step 13: Remove the cake from the freezer, cover the top with whipped cream, and drizzle with chocolate or caramel sauce.
This final touch brings the cake together visually and adds extra flavor. Ensure the whipped cream is spread evenly for a polished appearance and enhance with drizzle for visual appeal.
Step 14: Slice and serve, keeping any leftovers frozen.
Serving this cake slightly frozen leads to a perfectly creamy experience. Slicing while the cake is still a bit firm will help keep it neat for presentation.

Choosing the Right Ice Cream Flavor
Choosing the right flavor of ice cream can elevate your cake to new heights. Vanilla is a classic choice that pairs beautifully with any cake base, but don’t shy away from adventurous flavors like cookie dough or mint chocolate chip. Consider seasonal fruits or even coffee-infused ice creams for a unique twist. Be mindful of how the flavors will complement each other, ensuring a cohesive taste in every bite.
Enhancing Textures with Toppings
Adding textures to your ice cream cake can create an even more enjoyable experience. Crushed cookies, nuts, or even layers of chocolate chips can be added between cake layers or sprinkled on top. These toppings not only provide crunch but also enhance the visual appeal of your cake. Think about adding a layer of fudge or a layer of fruit compote for added flavor and texture.
Decorating Your Ice Cream Cake
Creating an impressive presentation is part of the enjoyment of a homemade ice cream cake. After coating with whipped cream, consider using a piping bag to create decorative swirls. Fresh fruits or edible flowers can be added as accents to enhance the visual appeal and freshness. Consider adding thematic decorations, such as sprinkles for a birthday, to make your cake feel even more special.
FAQs
What should I do if my ice cream is too hard to spread?
If your ice cream is too hard, let it sit at room temperature for a few minutes to soften slightly. It’s vital to have it spreadable but not melting, so keep a close watch.
What if my cake layers sink in the middle?
Sinking layers may indicate that the batter was over-mixed or that there wasn’t enough baking powder. Take care with mixing and ensure your ingredients are fresh.
Can I use a different size pan for this recipe?
You can use other pan sizes, but adjust the baking time accordingly. Smaller pans will require less time, while larger pans may take longer to bake.
What if my whipped cream is too soft to hold its shape?
If your whipped cream is too soft, it may need more whipping. Just be careful not to overwhip, which can create a grainy texture.
Can I incorporate fruit into the ice cream layers?
Yes, adding fruits can enhance the flavor. Make sure to chop them small and mix them into the ice cream gently, ensuring the consistency remains firm.
What if my cake layers come out too dry?
If your cake layers are dry, it may be due to overbaking. Keep a close eye on the cakes in the oven, checking for doneness a few minutes before the end of the suggested baking time.
Conclusion
Creating your own ice cream cake at home is a delightful project that marries cake and ice cream in an irresistible treat. With endless customization options, you can craft a dessert that suits any occasion and impresses your family and friends.
Embrace the process, enjoy the layering, and don’t shy away from making it your masterpiece. Your homemade ice cream cake will be a sweet celebration of flavors and textures, making it a treat to remember.
Recipe Card
Notes
Additional serving suggestions: pair with a crisp salad, garlic bread, or roasted seasonal vegetables for balance.
For make-ahead, prep components separately and assemble just before heating to preserve texture.
Taste and adjust with acid (lemon/vinegar) and salt right at the end to wake up flavors.


