Introduction
As the holiday season approaches, few confections capture the spirit of Christmas quite like Santa Claus macarons. These delicate French cookies, with their playful frosting and festive flair, make for an entertaining baking project during family gatherings.
Each bite reveals a tender shell, perfectly paired with a creamy filling that can evoke the flavors of the season. Not only are they a delight to taste, but they also add a whimsical touch to any dessert table, making them an excellent choice for holiday celebrations.
Ingredients
- 200g almond flour
Almond flour provides the base for macarons, lending them a nutty flavor and contributing to their signature texture. This fine flour helps create the delicate shell that characterizes macarons. - 200g powdered sugar
Powdered sugar sweetens the macarons and helps to create a smooth, glossy surface. Because it's finely ground, it blends well with almond flour, ensuring a consistent batter. - 120g egg whites (approximately 4 large eggs)
Egg whites provide the structure and stability needed for macarons. Whipped to stiff peaks, they trap air and allow the macarons to rise while baking. - 50g granulated sugar
Granulated sugar is used to stabilize the egg whites during whipping, allowing them to hold their shape when baked. This is crucial for achieving the perfect macaron texture. - 1/2 tsp vanilla extract
Vanilla extract adds a subtle, warm flavor that enhances the sweetness of the macarons. It's an essential element for balancing the overall taste. - Pinch of salt
A small amount of salt enhances the flavors in the macarons and balances the sweetness. It's a critical component that can make or break the flavor profile. - Red and white food coloring
Food coloring allows you to create festive colors for the Santa design, making these macarons visually appealing. Use high-quality gel food coloring for the best results. - 150g unsalted butter (for filling)
Butter serves as the base for the filling, providing a creamy texture and rich flavor. It can be whipped with sugar and flavorings to create various fillings. - 100g powdered sugar (for filling)
Powdered sugar sweetens the filling while helping achieve a smoother consistency. This ensures the filling complements the macarons without overpowering their delicate flavor. - 1 tsp heavy cream (for filling)
Heavy cream lightens the filling, making it smooth and spreadable. It adds richness, enhancing the mouthfeel of the macarons.
Directions & Preparation
Step 1: Prepare the macaron batter by mixing almond flour and powdered sugar.
Sift the almond flour and powdered sugar together into a bowl to eliminate lumps. This process is essential for a smooth macaron shell, as any clumps can lead to uneven baking. Ensure that the ingredients are well combined for the best results.
Step 2: Whip the egg whites to stiff peaks before adding granulated sugar.
Whipping the egg whites is a crucial step in macaron-making. This process aerates the whites, creating a meringue that provides structure. Achieving stiff peaks ensures that your macarons rise well, so take care not to overbeat, which can cause the meringue to become too dry or grainy.
Step 3: Fold the dry ingredients into the meringue gently.
Folding is a delicate process that requires a soft touch to avoid deflating the meringue. Use a spatula and a technique that combines the mixtures without overworking them. The right consistency is key; you should achieve a lava-like texture that flows slowly off the spatula.
Step 4: Portion and pipe the macaron batter onto parchment-lined trays.
Using a piping bag fitted with a round tip, pipe circles about 1.5 inches in diameter. Leave space between each macaroon as they will spread slightly. Tap the trays on the counter to release any air bubbles; this helps prevent cracking during baking.
Step 5: Let the macarons rest before baking.
Resting is a vital step that allows the macarons to form a skin, preventing them from cracking in the oven. This can take anywhere from 20 to 60 minutes, depending on humidity levels. You’ll know they are ready when they feel dry to the touch.
Step 6: Bake the macarons in a preheated oven at 300°F (150°C).
Baking at the right temperature is crucial for achieving the signature 'feet' of the macarons. Keep an eye on them as they bake; they should rise without browning too much. The baking time usually ranges from 15 to 20 minutes.
Step 7: Prepare the filling by creaming the butter and powdered sugar together.
For a smooth, creamy filling, it's essential to beat the butter until it's fluffy before gradually adding powdered sugar. This process creates a light texture that pairs well with the macarons. Adjust the consistency with heavy cream if it’s too thick.
Step 8: Assemble the macarons by pairing shells with the filling.
Pair similar-sized shells for even filling distribution. Use a piping bag to add the filling to one shell before pressing the other on top. This step requires gentle pressure to avoid cracking the delicate shells.
Step 9: Decorate the macarons to look like Santa Claus.
Use melted chocolate and food coloring to create eyes, a hat, and a beard on the assembled macarons. This playful decoration not only enhances the visual appeal but also adds another layer of flavor, making each bite even more delightful.
Step 10: Allow the assembled macarons to mature in the refrigerator overnight.
Maturing macarons overnight allows the flavors to meld and the shells to soften slightly, making for a more harmonious treat. This crucial step enhances the overall experience, so patience will reward you with delightful flavors.

The Importance of Aging Macarons
Aging macarons is a critical step that many novice bakers overlook. Allowing your assembled macarons to sit in the fridge for at least 24 hours improves their texture and taste. This resting period allows the moisture from the filling to permeate the shell, making them chewier and more flavorful.
Creative Filling Variations
While the traditional buttercream filling is excellent, don’t hesitate to play with flavors. Consider using peppermint extract for a refreshing holiday twist or adding crushed candy canes for texture. Different fillings can transform the overall experience of your Santa Claus macarons, contributing to the festive cheer.
Troubleshooting Common Macaron Issues
Despite their whimsical appearance, macarons can be finicky. Common issues include hollow shells or cracking. Ensure accurate egg white measurements and proper whipping techniques. Pay attention to humidity levels, as they can affect the macaron batter and potentially lead to disappointing results.
FAQs
What is the ideal consistency for macaron batter?
The ideal macaron batter should flow like lava off the spatula, holding a figure-eight shape without breaking. It should be smooth and slightly glossy.
What should I do if my macarons look flat?
If your macarons turn out flat, it might be due to under-whipping the egg whites. Ensure they reach stiff peaks before folding in the dry ingredients.
Can I use egg whites from a carton instead of fresh?
While fresh egg whites are preferred for their stability, pasteurized egg whites can be used. Just make sure to check the packaging for any alternative instructions.
Why did my macarons crack on top while baking?
Cracking can occur due to insufficient resting time before baking or an overly hot oven. Ensure that they form a skin and maintain the correct baking temperature.
How can I make these macarons more festive?
Incorporate holiday flavors or use festive stencils while decorating. Consider adding citrus zest or spices like nutmeg or cinnamon to the filling for seasonal flair.
Is it possible to make smaller versions of these macarons?
Yes, you can pipe smaller macarons; however, adjust the baking time to about 10-12 minutes. Ensure consistent sizing for even baking.
Conclusion
Creating Santa Claus macarons is a delightful way to celebrate the holiday season while honing your baking skills. The combination of flavors, colors, and textures makes them a standout treat at any gathering.
Don't be afraid to experiment with flavors and decorations to make them your own. Whether enjoyed with family or gifted to friends, these whimsical macarons will surely spread joy and cheer.
Recipe Card
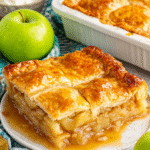
Delightful Apple Slab Pie for Home Bakers
Ingredients
- 2 1/2 cups all-purpose flour
- 1 cup unsalted butter cold and cubed
- 1/4 cup granulated sugar
- 1/2 teaspoon salt
- 1/4 to 1/2 cup cold water
- 6 to 8 medium apples peeled, cored, and sliced
- 1/2 cup brown sugar
- 2 teaspoons ground cinnamon
- 1 tablespoon lemon juice
- 1 tablespoon cornstarch
- 1 egg beaten (for egg wash)
Instructions
- Prepare the pie crust by mixing flour, sugar, and salt together.
- Cut in the cold butter until the mixture resembles coarse crumbs.
- Gradually add cold water, a tablespoon at a time, until the dough holds together.
- Divide the dough in half and refrigerate for at least 1 hour.
- Preheat your oven to 375°F (190°C).
- Roll out one portion of the dough to fit a rimmed baking sheet.
- Transfer the rolled-out dough to the baking sheet and trim the edges.
- In a bowl, combine the sliced apples, brown sugar, cinnamon, lemon juice, and cornstarch.
- Pour the apple mixture onto the crust and spread it evenly.
- Roll out the second portion of dough and place it over the apples, sealing the edges.
- Brush the top with beaten egg for a golden finish.
- Bake for 45-50 minutes, or until the crust is golden and the filling is bubbling.
- Let the pie cool for at least 30 minutes before slicing.
Notes
Additional serving suggestions: pair with a crisp salad, garlic bread, or roasted seasonal vegetables for balance.
For make-ahead, prep components separately and assemble just before heating to preserve texture.
Taste and adjust with acid (lemon/vinegar) and salt right at the end to wake up flavors.