Introduction
Fudge is a classic treat often associated with sweet memories, family gatherings, and the warmth of homemade desserts. Easy Marshmallow Swirl Fudge marries the rich creaminess of traditional fudge with a delightful swirl of fluffy marshmallow, creating a treat that’s not only pleasing to the palate but also visually stunning.
This recipe emphasizes simplicity, making it ideal for home cooks of all levels. With just a handful of ingredients and minimal effort, you can whip up a batch of fudge that impresses at any occasion. Perfect for gifting or enjoying during cozy nights in, this fudge is bound to become a favorite in your dessert repertoire.
Ingredients

- 2 cups granulated sugar
Sugar is the primary sweetener in this fudge, providing not only sweetness but also contributing to the smooth texture. It plays a crucial role in the fudge’s structure, allowing it to set perfectly when cooled. - 1/2 cup unsweetened cocoa powder
Cocoa powder gives the fudge its rich chocolate flavor, transforming it from regular fudge into a decadent chocolate treat. It also adds depth and complexity to the overall taste. - 1/2 cup unsalted butter
Butter adds creaminess and richness to the fudge, enhancing its flavor and giving it a buttery texture that melts in your mouth. It also helps to bind the ingredients together. - 1 cup sweetened condensed milk
Sweetened condensed milk provides sweetness and moisture, making the fudge incredibly creamy. Its thick consistency helps achieve the right texture without the need for cream. - 1 cup mini marshmallows
Mini marshmallows provide a fun and sweet contrast to the chocolate fudge while creating those charming swirls. They melt seamlessly into the mixture, adding both flavor and texture. - 1 tsp vanilla extract
Vanilla extract enhances the overall flavor of the fudge, adding depth and aroma. It balances out the sweetness and contributes to the overall harmony of taste. - 1/4 tsp salt
A pinch of salt enhances the sweetness of the fudge and rounds out the flavors. It’s essential in bringing out the richness of the chocolate and creates a more balanced dessert.
Directions & Preparation
Step 1: Prepare the baking dish.
Start by lining an 8-inch square baking dish with parchment paper or greasing it lightly. This step is key to ensuring that the fudge comes out of the pan easily once set. Proper preparation of the dish prevents sticking and makes cutting the fudge much simpler.
Step 2: Combine sugar, cocoa powder, and salt.
In a medium-sized saucepan over medium heat, combine the granulated sugar, cocoa powder, and a pinch of salt. Stirring these dry ingredients together first allows for an even distribution of cocoa, which is crucial in creating a smooth texture in the fudge as it melts.
Step 3: Add butter and condensed milk.
Once the dry ingredients are well combined, add the unsalted butter and sweetened condensed milk to the saucepan. Stir continuously until the mixture is smooth and fully melted. This step is important for achieving that silky consistency that is characteristic of good fudge.
Step 4: Bring to a gentle boil.
Increase the heat slightly to bring the mixture to a gentle boil while continuing to stir constantly. Allowing it to reach this stage is crucial for the fudge to thicken properly. Monitor closely to avoid scorching. You’ll notice the mixture bubbling, which indicates it’s ready for the next stage.
Step 5: Remove from heat and mix in vanilla.
Once the fudge has reached a gentle boil and thickened, remove it from the heat. Stir in the vanilla extract, which adds aromatic depth to your fudge. This step is essential as it completes the flavor profile, allowing the sweetness and richness to shine.
Step 6: Fold in mini marshmallows.
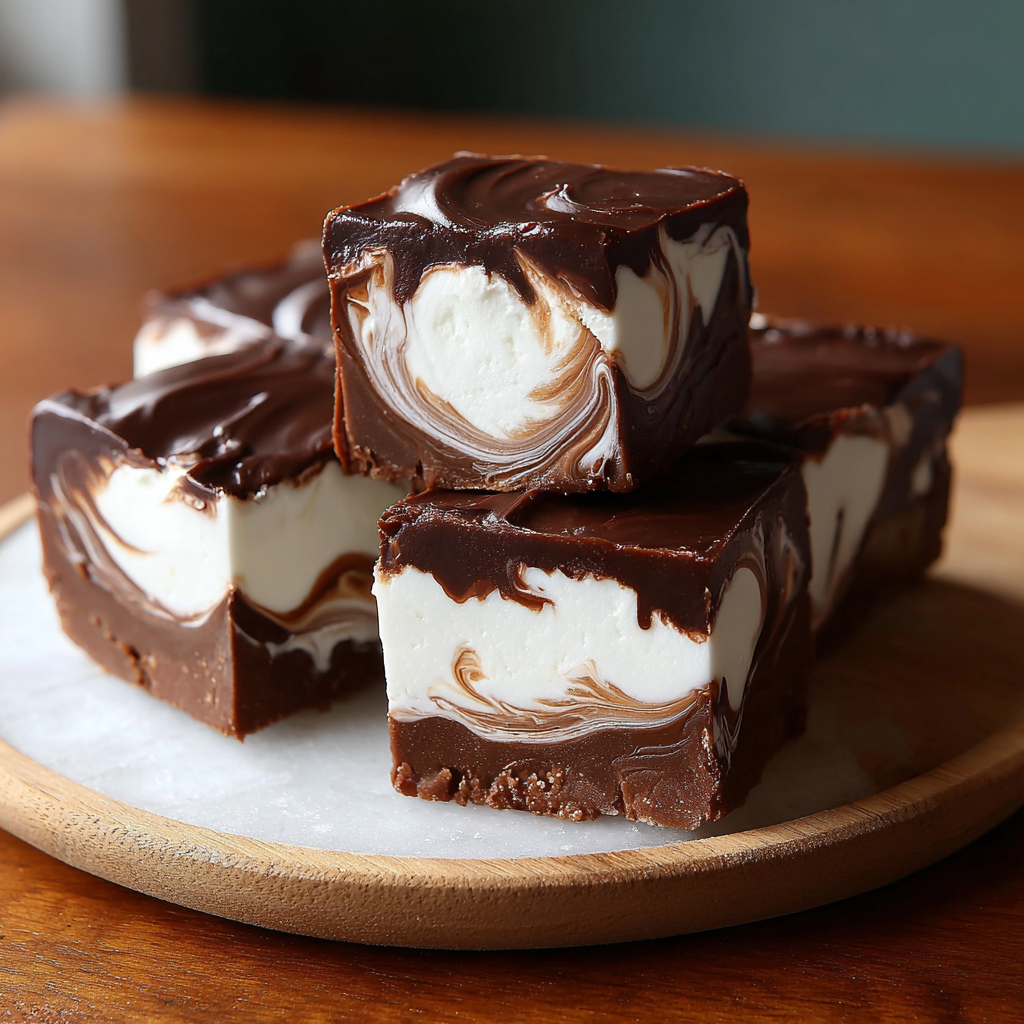
Next, fold the mini marshmallows into the warm fudge mixture. They will begin to soften and melt slightly, creating delightful swirls. This step is what transforms plain fudge into a visually appealing treat, giving it that inviting look and a contrasting texture.
Step 7: Pour into the prepared dish.
Pour the melted mixture into the prepared baking dish, using a spatula to spread it evenly. This is your chance to ensure an even surface, which will make cutting the fudge easier once set. Gently shake the dish to eliminate air bubbles and further smooth the top if necessary.
Step 8: Let cool and set.
Allow the fudge to cool at room temperature for several hours until it’s completely set. If you’re in a hurry, you can place it in the refrigerator to speed up the setting process. Proper cooling is essential so that your fudge achieves that ideal cut consistency; otherwise, it may be too gooey.
Step 9: Cut and serve.
Once set, lift the fudge from the dish using the parchment paper. Cut into squares with a sharp knife, cleaning the knife between cuts for nice edges. This final step not only makes the fudge ready to serve but also allows you to enjoy the beautiful swirls of marshmallow in each piece.
Creating the Perfect Swirl
Achieving the perfect marshmallow swirl in your fudge is all about timing and temperature. By folding the marshmallows into the warm fudge mixture, they create those delightful streaks instead of simply melting away. Make sure your fudge mixture is still warm but not boiling as you incorporate the marshmallows, as this will help maintain their shape and create a beautiful visual effect.
Experiment with Flavors
While this recipe focuses on classic chocolate and marshmallow flavors, feel free to experiment! Consider adding nuts, crushed cookies, or even a hint of peppermint extract for a festive twist. The basic fudge base is incredibly versatile, allowing for substitutions that can cater to your flavor preferences while still retaining that creamy quality.
Presentation Matters
The visual appeal of your fudge can be just as important as its taste. Consider dusting the top with cocoa powder, or drizzling some melted white chocolate over the set fudge before cutting it into squares. Simple garnishes can elevate your creation, making it not only delicious but also a stunning centerpiece for any dessert table.
FAQs
Why is my fudge too thick or too thin?
If your fudge is too thick, it may have cooked too long, causing it to dry out. If it’s too thin, it likely didn’t boil long enough or didn’t cool properly. Adjusting cooking time next time can help achieve the perfect consistency.
Can I make this fudge without cocoa powder?
Yes, you can omit the cocoa powder for a vanilla marshmallow fudge. Just replace the cocoa with an additional cup of powdered sugar to maintain the overall texture.
What can I do if my fudge flavor is bland?
If your fudge tastes bland, consider adding a pinch more salt to enhance the flavor or a splash more vanilla extract. A touch of espresso powder can also intensify the chocolate flavor.
Why did my marshmallow fudge not set properly?
Your fudge may not have set if it didn’t reach the right temperature during cooking or if it was disturbed too much while cooling. Ensure that you allow it time to cool at room temperature gracefully.
How can I add toppings or mix-ins to my fudge?
You can fold in mix-ins like nuts, crushed cookies, or sprinkles into the warm fudge mixture right before pouring it into the baking dish. This will incorporate them evenly throughout the fudge.
Can I double the recipe for a bigger batch?
Absolutely! You can double the ingredients; just make sure to use a larger baking dish to accommodate the extra fudge. Keep in mind that cooking and cooling times might vary slightly.
Conclusion
Easy Marshmallow Swirl Fudge encapsulates the essence of comfort food with its creamy, luscious texture and delightful flavors. Ideal for both novice bakers and seasoned cooks, this recipe promises a delicious outcome with minimal fuss.
So, gather your ingredients and dive into this enjoyable baking experience. Enjoy your fudge in good company or gift it to friends and family—it’s bound to bring smiles all around!
Notes
Additional serving suggestions: pair with a crisp salad, garlic bread, or roasted seasonal vegetables for balance.
For make-ahead, prep components separately and assemble just before heating to preserve texture.
Taste and adjust with acid (lemon/vinegar) and salt right at the end to wake up flavors.


