
Introduction
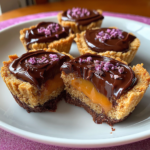
Twix Cookie Cups blend the delightful elements of classic Twix bars into a delightful cookie format. These treats offer a rich combination of buttery cookie, creamy caramel, and a hint of chocolate that’s simply irresistible.
Perfect for family gatherings or a cozy night in, Twix Cookie Cups are not only visually appealing but also a joy to make. As you dive into the baking process, the layers of flavor and texture will have your taste buds dancing.
Ingredients
- 1 cup unsalted butter, softened
Butter plays a crucial role in providing moisture and richness to the cookie dough. The creaming process helps aerate the butter, leading to a tender, light cookie. - ¾ cup granulated sugar
Granulated sugar sweetens the cookie while also contributing to its structure and texture. It helps create a chewy interior when baked properly. - ¾ cup brown sugar, packed
Brown sugar adds moisture due to its molasses content, enhancing the cookie's chewiness. The deeper flavor profile it brings balances well with the buttery notes. - 2 large eggs
Eggs act as a binder in cookie recipes, providing stability and moisture. They help the cookies rise and give them a rich texture. - 2 teaspoons vanilla extract
Vanilla enhances the overall flavor profile, adding warmth and aromatic qualities that complement the sweetness of the sugars. - 2 cups all-purpose flour
Flour forms the base of the cookie, providing structure. The right amount ensures that the cookies are neither too dense nor too fragile. - ½ teaspoon baking soda
Baking soda is a leavening agent that helps cookies rise and achieve their ideal texture, contributing to the softness and spread during baking. - ½ teaspoon salt
Salt balances the sweetness in the cookies and enhances the flavors. It also aids in the overall texture by tightening gluten strands. - 1 cup caramel candies
The caramel not only provides a gooey center reminiscent of traditional Twix bars but also adds a creamy sweetness that pairs beautifully with the cookie base. - 1 cup milk chocolate chips
Milk chocolate chips add a rich, sweet flavor that melts beautifully on top of the cookie cups, tying all the elements together for a decadent finish.
Directions & Preparation
Step 1: Preheat your oven to 350°F (175°C).
Preheating the oven ensures that the temperature is just right when the cookie cups go in. This step is essential for achieving a consistent bake, helping the cookies rise evenly and develop the right texture.
Step 2: In a mixing bowl, cream together the softened butter, granulated sugar, and brown sugar until light and fluffy.
Creaming the butter and sugars is a crucial step that incorporates air into the mixture. This process contributes to the cookie's texture, making them soft and light. Aim for a pale color and a fluffy consistency.
Step 3: Add eggs, one at a time, mixing well after each addition, then stir in the vanilla.
Incorporating eggs one at a time helps to stabilize the mixture and ensures even distribution of wet ingredients, which is key in achieving a smooth batter. Vanilla adds a fragrant depth to the cookies.
Step 4: In a separate bowl, whisk together flour, baking soda, and salt.
Whisking the dry ingredients separately ensures that the baking soda and salt are evenly distributed throughout the flour. This step prevents clumping and guarantees consistent flavor and rise in each cookie cup.
Step 5: Gradually add the dry ingredients to the wet mixture, mixing until just combined.
Mixing until just combined prevents overworking the dough, which can lead to tough cookies. Look for a uniform mixture without visible pockets of flour, but do not overmix.
Step 6: Grease a muffin tin with cooking spray, then scoop the cookie dough into each cavity, pressing down to form a cup shape.
Greasing the muffin tin is crucial for ensuring that the cookie cups release easily once baked. Pressing the dough down firmly helps create a defined shape, allowing space for the caramel and chocolate toppings.
Step 7: Bake for 10-12 minutes, or until the edges are golden.
Baking the cookie cups at the right temperature and time ensures they are fully cooked through but still remain soft in the center. Keep an eye on them, as overbaking can lead to a dry texture.
Step 8: Remove from the oven and let the cups cool in the pan for about 5 minutes before transferring to a wire rack.
Cooling in the pan helps the cookie cups hold their shape while they set. Transferring them to a wire rack allows for even cooling, preventing sogginess at the bottom.
Step 9: While the cups are still warm, fill each center with caramel candies.
Filling the warm cookie cups with caramel allows it to melt slightly, creating a gooey center that’s reminiscent of the original Twix bar. Make sure to fill each cup generously for the best experience.
Step 10: Melt the chocolate chips and drizzle them over the filled cookie cups.
Drizzling melted chocolate adds the finishing touch to the cookie cups. Ensure the chocolate is warm enough to flow easily but not so hot that it cooks the caramel. This step elevates the sweetness and visually enhances the treat.
Step 11: Let the chocolate set before serving.
Allowing the chocolate to set creates a beautiful, shiny finish. This step is essential for making the treats easy to handle while maintaining their appealing look.

The Art of Crafting Cookie Cups
Creating Twix Cookie Cups is like sculpting with dough, where precision and care lead to an incredible dessert experience. The combination of textures—from the soft cookie to the rich caramel—creates a delightful mouthfeel, making each bite memorable. This recipe invites creativity; experiment with fillings or toppings to customize your dessert for different occasions.
The Perfect Balance of Flavors
The sweet, buttery notes of the cookie meld wonderfully with the rich caramel and chocolate, offering a balanced palate experience. Each bite delivers a nostalgic twist that evokes memories of enjoying Twix bars. It’s the harmony of flavors that makes these cookie cups so special—perfect for satisfying a sweet tooth while still feeling gourmet.
Customizing Your Cookie Cups
Don’t hesitate to explore different variations with your Twix Cookie Cups. Consider using dark chocolate or even white chocolate for drizzling, or add a sprinkle of sea salt for contrast. You might choose to incorporate nuts or different flavors of caramel to match your taste. The flexibility of this recipe invites home cooks to make it their own, celebrating personal culinary creativity.
FAQs
What if my cookie cups overflow while baking?
If your cookie cups overflow, it may be due to overfilling the muffin tins. Next time, try filling each cup two-thirds full to allow space for the dough to rise without spilling.
Can I use other types of chocolate for topping?
Absolutely! Feel free to experiment with milk, dark, or even white chocolate for drizzling on your cookie cups. Each type will add its own unique flavor profile.
Why did my cookie cups turn out too crumbly?
Crumbly cookie cups can result from too much flour or inadequate butter. Make sure to measure both accurately and avoid compacting the flour when measuring to maintain the right texture.
How can I adjust the amount of caramel used?
If you prefer less caramel, simply reduce the number of candies you add to the center. However, keep in mind it may affect the overall indulgent quality that makes these cookies special.
What can I do if the caramel gets too hard?
If the caramel hardens too much, you can gently reheat the cookie cups in the microwave for a few seconds to soften it slightly, making it easier to enjoy.
Can I make the cookie dough in advance?
Yes, the cookie dough can be prepared and refrigerated for up to 2 days before baking. Just remember to let it sit at room temperature for about 15 minutes before scooping into the muffin tin.
Conclusion
Twix Cookie Cups are a delightful way to indulge your sweet tooth while impressing family and friends with your baking skills. This recipe is simple yet rewarding, blending familiar flavors into a new creative form.
Whether for special occasions or a spontaneous treat, these cookie cups will surely bring smiles and satisfy cravings. Happy baking!
Recipe Card
Delicious Twix Cookie Cups for Sweet Indulgence
Ingredients
- 1 cup unsalted butter softened
- ¾ cup granulated sugar
- ¾ cup brown sugar packed
- 2 large eggs
- 2 teaspoons vanilla extract
- 2 cups all-purpose flour
- ½ teaspoon baking soda
- ½ teaspoon salt
- 1 cup caramel candies
- 1 cup milk chocolate chips
Instructions
- Preheat your oven to 350°F (175°C).
- In a mixing bowl, cream together the softened butter, granulated sugar, and brown sugar until light and fluffy.
- Add eggs, one at a time, mixing well after each addition, then stir in the vanilla.
- In a separate bowl, whisk together flour, baking soda, and salt.
- Gradually add the dry ingredients to the wet mixture, mixing until just combined.
- Grease a muffin tin with cooking spray, then scoop the cookie dough into each cavity, pressing down to form a cup shape.
- Bake for 10-12 minutes, or until the edges are golden.
- Remove from the oven and let the cups cool in the pan for about 5 minutes before transferring to a wire rack.
- While the cups are still warm, fill each center with caramel candies.
- Melt the chocolate chips and drizzle them over the filled cookie cups.
- Let the chocolate set before serving.
Notes
Additional serving suggestions: pair with a crisp salad, garlic bread, or roasted seasonal vegetables for balance.
For make-ahead, prep components separately and assemble just before heating to preserve texture.
Taste and adjust with acid (lemon/vinegar) and salt right at the end to wake up flavors.


