Introduction
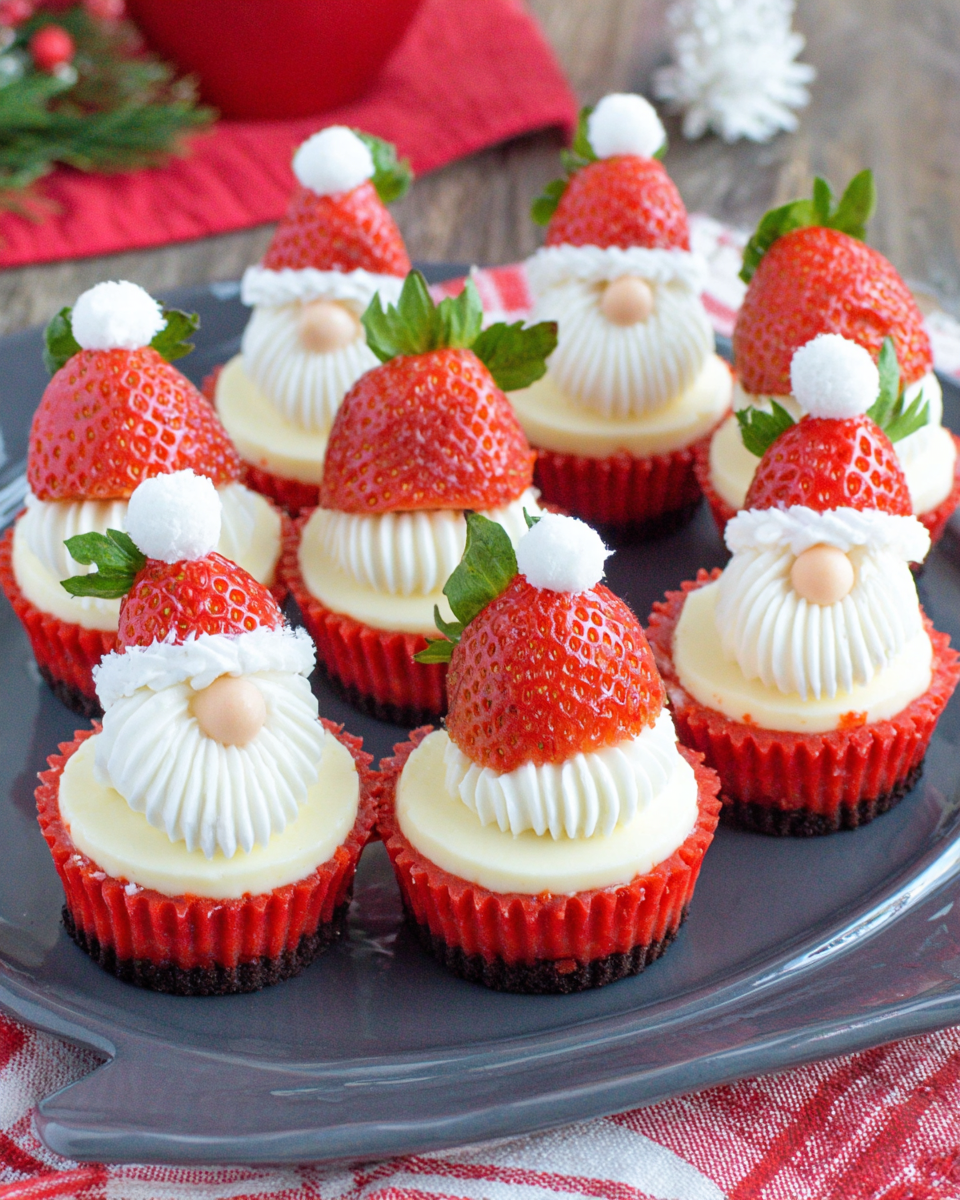
As the holiday season approaches, festive treats become a special part of our celebrations. One delightful and creative option that perfectly captures the holiday spirit is the Cheesecake Strawberry Santa. These charming little Santas not only bring joy but also tantalize taste buds with rich cheesecake and fresh strawberries.
Combining the creamy texture of cheesecake with the juiciness of ripe strawberries, these playful desserts are bound to be a hit at any gathering. Whether you’re hosting a family dinner or attending a holiday potluck, these Cheesecake Strawberry Santas add a whimsical touch while being easy to prepare.
With their striking appearance and delightful taste, they provide a fun way to indulge in the flavors of the season. Let's dive into the recipe and explore how to bring these adorable Santas to life in your own kitchen.
Ingredients
- 8 oz cream cheese, softened
Cream cheese forms the base of the cheesecake, giving it a rich and creamy texture. It’s essential to soften it before mixing to ensure a smooth consistency. - 1/2 cup granulated sugar
Sugar adds sweetness to the cheesecake mixture, balancing the creamy richness of the cream cheese. It also helps in creating a smooth texture when mixed thoroughly. - 1 tsp vanilla extract
Vanilla extract enhances the overall flavor profile of the cheesecake, providing a warm and aromatic sweetness that complements the other ingredients. - 1 cup heavy whipping cream
Heavy whipping cream is whipped to create a light and airy texture for the cheesecake filling. It contributes to the luxurious mouthfeel that makes the Santas delightful. - 1 package of fresh strawberries (about 1 lb)
Strawberries serve as both the body and hat of the Santa figures. Their natural sweetness and vibrant red color make them perfect for this festive presentation. - 1/4 cup white chocolate chips
Melted white chocolate is used to secure the strawberry tops and give decorative flair, mimicking Santa's hat. It adds a creamy sweetness that pairs exceptionally well with strawberries. - Mini marshmallows
Mini marshmallows are added for the eyes and other decorative touches, enhancing the whimsical appearance of the Santas while providing additional sweetness.
Directions & Preparation
Step 1: Prepare the cheesecake filling by mixing cream cheese, sugar, and vanilla.
In a mixing bowl, combine softened cream cheese, granulated sugar, and vanilla extract. Use an electric mixer on medium speed to achieve a smooth, creamy consistency. This step is crucial because it ensures that the sugar dissolves fully and blends seamlessly into the cream cheese, resulting in an even cheesecake mixture with no lumps.
Step 2: Whip the heavy cream until soft peaks form.
In a separate bowl, whip the heavy cream until it forms soft peaks, which should take about 3-5 minutes with an electric mixer. The whipped cream adds lightness and volume to the cheesecake filling, transforming a dense mixture into a fluffy delight. Be careful not to overwhip, as this can result in a grainy texture.
Step 3: Fold whipped cream into the cream cheese mix.
Gently fold the whipped cream into the cream cheese mixture using a spatula. This step is critical for maintaining the airy texture; simply mix until no white streaks remain. Folding helps to keep the lightness while integrating the components smoothly, achieving the desired creamy consistency without losing air.
Step 4: Wash the strawberries and cut tops to create Santa hats.
Rinse the strawberries under cold water and remove their green tops carefully. For Santa hats, cut a small triangle or a cap shape from the top of each strawberry. This step not only creates an attractive Santa appearance but also allows for creative presentation, ensuring your finished product is visually appealing.
Step 5: Assemble the Santas using the cheesecake filling.
Using a piping bag or a spoon, pipe or spoon the cheesecake mixture into each strawberry; fill them generously. This step is where the fun begins, as you shape each Santa and prepare to add the toppings. Be sure to pack the filling in well for a steady structure.
Step 6: Drizzle melted white chocolate on top for design.
Melt the white chocolate chips in a microwave-safe bowl and let it cool slightly. Drizzle the melted chocolate over the tops of the filled strawberries to create Santa's hat effect. This addition not only enhances the visual appeal but also adds an extra layer of delightful sweetness to each strawberry.
Step 7: Add mini marshmallows as eyes and decoration.
Place two mini marshmallows on each filled strawberry to represent Santa’s eyes. You could also add a small piece of the stem or green decoration for further authenticity. This step adds a touch of whimsy and fun, making the Santas come alive visually.
Step 8: Chill before serving to set the filling.
Refrigerate the completed Cheesecake Strawberry Santas for at least 30 minutes to help the filling set and the chocolate firm up. Chilling not only enhances the flavors as they meld but also ensures that each Santa holds its shape perfectly when served.

Creative Variations on Cheesecake Strawberry Santas
While the traditional Cheesecake Strawberry Santas are delightful, feel free to get creative! Consider using different flavors of cheesecake like chocolate or raspberry, or experimenting with toppings such as crushed nuts or coconut for a tropical twist. Mixing and matching flavors can personalize your Santas to suit your family’s taste.
Perfect Parties with Cheesecake Strawberry Santas
These whimsical Dessert Santas are not only fun but also serve as a conversational centerpiece at any holiday gathering. Pair them with simple spiced cookies or a warm beverage for an inviting treat table. They’re sure to impress guests of all ages, adding both sweetness and cheer to your festive celebrations.
Gifting Cheesecake Strawberry Santas
Consider packing Cheesecake Strawberry Santas in a decorative box for a delightful holiday gift. With their charming look, they make an impressive present that friends and family will love. Just ensure to keep them refrigerated until they are gifted to maintain freshness and quality, showcasing your thoughtfulness in the festive season.
FAQs
What if my cheesecake mixture is too thick?
If your cheesecake mixture is too thick, you can add a tablespoon of heavy cream to loosen it up. Mix gently until the desired consistency is reached.
Can I use frozen strawberries instead of fresh?
It’s recommended to use fresh strawberries for the best appearance and flavor, but if using frozen, thaw and drain them well to avoid excess moisture.
What can I do if my white chocolate doesn’t melt smoothly?
If your white chocolate seizes or doesn’t melt smoothly, try adding a teaspoon of vegetable oil while melting to achieve a smoother consistency.
Can I add other decorations besides mini marshmallows?
Absolutely! Consider using edible glitter, colored sugar, or even small candy pieces to enhance the fun and festive look of your Santas.
How can I adjust the sweetness if it’s too bland?
If the cheesecake filling tastes bland, gradually fold in more sugar, adjusting to your personal preference while keeping the airy texture.
Can I scale this recipe for larger gatherings?
Certainly! Simply multiply the ingredient quantities based on the number of servings you want, adjusting the filling quantities to ensure each strawberry is well-filled.
Conclusion
In just a few simple steps, you can create these delightful Cheesecake Strawberry Santas that are sure to bring smiles to your holiday gatherings. With their creamy filling and striking presentation, they perfectly capture the essence of festive cheer.
So gather your ingredients, unleash your creativity, and share the joy of these charming treats with your loved ones. Happy cooking and merry celebrations!
Recipe Card
Notes
Additional serving suggestions: pair with a crisp salad, garlic bread, or roasted seasonal vegetables for balance.
For make-ahead, prep components separately and assemble just before heating to preserve texture.
Taste and adjust with acid (lemon/vinegar) and salt right at the end to wake up flavors.


