Introduction
Indulging in a rich dessert can sometimes feel like an unattainable luxury, but these Vanilla Bean Crème Brûlée Cheesecake Cupcakes bring gourmet flair right into your kitchen. Combining the velvety smoothness of cheesecake with the allure of crème brûlée, these cupcakes are perfect for special occasions or treating yourself after a long week.
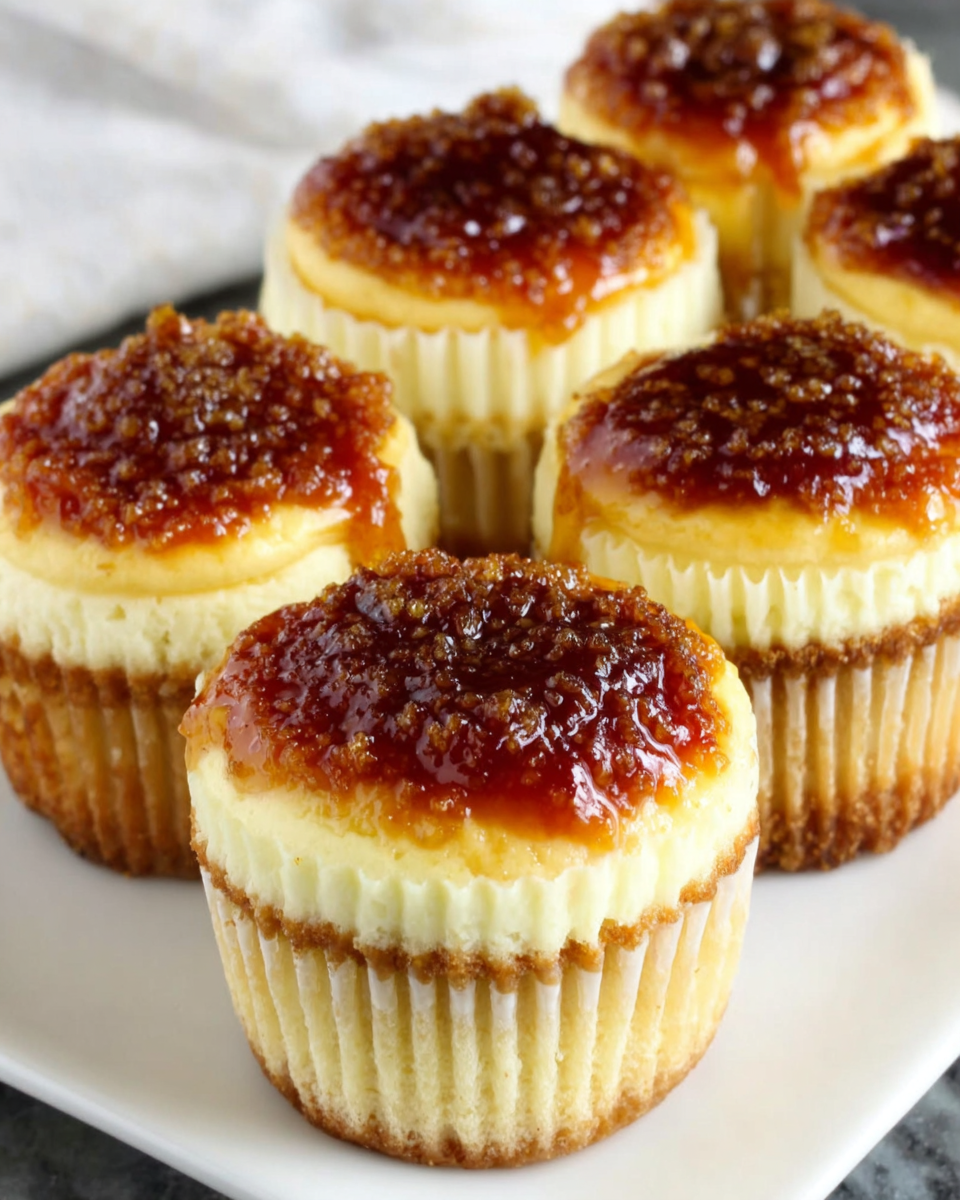
Each bite is a delightful fusion of textures and flavors — a crisp, caramelized sugar top gives way to a creamy, cheesecake center enriched with real vanilla beans. With a simple approach to a seemingly complex dessert, you can impress friends and family without spending hours in the kitchen.
Ingredients
- 1 cup graham cracker crumbs
These serve as the base for your cupcakes, providing a crunchy, sweet finish that mimics the classic cheesecake crust. - 1/4 cup unsalted butter, melted
Butter adds richness and helps to bind the graham cracker crumbs together, creating a sturdy crust. - 2 (8 oz) packages cream cheese, softened
Cream cheese is the star of the filling, delivering that classic cheesecake tanginess and richness. - 1 cup granulated sugar
Sugar sweetens the cheesecake filling and is essential for achieving the caramelized top on your cupcakes. - 1 teaspoon vanilla bean paste
Vanilla bean paste enhances the flavor profile with its deep, aromatic essence, while the flecks of vanilla beans add visual appeal. - 2 large eggs
Eggs contribute to the structure and creaminess of the cheesecake filling, helping it set perfectly. - 1/2 cup heavy cream
Heavy cream makes the filling rich and luxurious, creating a beautifully smooth texture. - 1/4 cup sugar for brûlée topping
This sugar caramelizes under heat, forming that signature crunchy topping that contrasts deliciously with the creamy filling.
Directions & Preparation
Step 1: Preheat the oven to 325°F (160°C).
Preheating the oven ensures even cooking throughout the baking process. Cupcakes rely on consistent temperatures to rise and set properly, preventing them from becoming dense.
Step 2: Line a cupcake pan with paper liners.
Using liners simplifies cleanup and helps the cupcakes retain their shape. Choose liners that complement the dessert’s delightful aesthetic.
Step 3: In a medium bowl, combine graham cracker crumbs and melted butter, then mix well.
Properly combining the crumbs with melted butter creates a cohesive mixture that holds together when pressed into the bottom of the cupcake liners. This is crucial for achieving a solid foundation.
Step 4: Press the mixture firmly into the bottom of each cupcake liner.
Pressing the mixture evenly and firmly ensures the crust holds its shape during baking. An even base provides a consistent texture with each bite.
Step 5: Bake the crusts for 8-10 minutes until golden, then remove and cool.
Baking the crusts enhances their flavor and gives them a sturdy texture. Allowing them to cool completely prevents the cheesecake filling from becoming too warm and melting.
Step 6: In a large mixing bowl, beat the cream cheese until smooth.
This step is crucial for a creamy filling. Ensuring the cream cheese is smooth minimizes lumps in the final product, resulting in a silky texture.
Step 7: Gradually add sugar and continue to beat until combined.
This gradual incorporation helps aerate the mixture, contributing to a lighter final texture. Keeping the mixture well combined is key for the cheesecake filling.
Step 8: Add vanilla bean paste and blend thoroughly.
Incorporating vanilla bean paste while mixing thoroughly enhances the filling with deep, aromatic flavors and adds visual appeal through the flecks of vanilla.
Step 9: Blend in the eggs one at a time, mixing just until incorporated after each addition.
Adding the eggs individually ensures they are fully integrated into the mixture without overmixing, which can lead to a dense filling.
Step 10: Finally, add the heavy cream and mix until smooth and consistent.
Heavy cream not only enriches the filling, but it also contributes to the smooth texture. Mixing until fully combined is essential for uniformity.
Step 11: Pour the cream cheese mixture over the cooled crusts.
Pouring the filling evenly allows for uniform baking and helps prevent cracks during the cooling process.
Step 12: Bake the cupcakes for 20-25 minutes or until the edges are set but the center is slightly jiggly.
Baking until the edges are set ensures structure while leaving the center slightly jiggly is key for that creamy cheesecake consistency.
Step 13: Remove cupcakes from the oven and let cool to room temperature, then refrigerate.
Cooling the cupcakes allows them to set properly, ensuring that the texture remains creamy once fully chilled. Refrigeration is crucial for flavor development.
Step 14: Before serving, sprinkle a thin layer of sugar on top of each cupcake and use a kitchen torch to caramelize.
The sugar layer must be thin enough for a quick melt but evenly distributed across the surface. A kitchen torch provides control, creating that classic crème brûlée finish.
Step 15: Allow the caramelized tops to cool for a few minutes before serving.
This cooling period allows the sugar to harden slightly, creating a satisfying crunch when you dig into the cupcake. It also enhances the contrast between the warm sugar and the cold cheesecake.

The Art of Infusing Flavor
Using real vanilla beans or quality vanilla bean paste in your cupcakes dramatically elevates their flavor. Unlike vanilla extract, which is often a flat single note, vanilla bean paste provides depth with flecks of actual vanilla bean, enhancing both taste and presentation. For the most vibrant flavor, always opt for high-quality ingredients.
Achieving the Perfect Crust
The graham cracker crust serves as the foundational element of these delectable cupcakes. Ensuring your crumbs are evenly mixed with melted butter and pressed firmly into the liners will yield a texture that holds well against the creamy filling. It’s essential to bake the crust until it’s golden to impart a distinctive flavor that complements the cheesecake filling.
Mastering the Crème Brûlée Finish
The caramelized sugar atop each cupcake transforms the dessert into a visual and textural delight. Using a culinary torch allows you to control the caramelization carefully, providing that spectacular crack when a spoon breaks through. For the best results, keep the layer thin to achieve that perfect balance between sweetness and a toasty flavor.
FAQs
Why did my cheesecake filling crack during baking?
Cracks typically occur due to overmixing or baking at too high a temperature. Ensure that all ingredients are at room temperature before mixing and avoid overbaking.
What if my crème brûlée topping caramelizes too quickly?
If the sugar burns, it's often because the torch is too close. Keep the torch a few inches away, moving it in a circular motion for even caramelization.
Can I scale this recipe to make a larger batch?
Yes, simply double or triple the ingredient quantities, ensuring you adjust the baking time slightly as necessary. If using multiple pans, rotate them in the oven for even baking.
What if my batter seems too thick?
If your cheesecake batter is too thick, it may need more heavy cream to achieve a smoother consistency. Incorporate it slowly until you reach your desired texture.
How can I enhance the flavor further if I want something different?
Consider infusing the heavy cream with citrus zest or spices like cardamom before incorporating it into the cheesecake mix for added depth.
What texture should I expect for the final cupcake?
The ideal texture of the finished cupcake should be creamy with a smooth cheesecake center and a firm but slightly crumbly graham cracker crust.
Conclusion
These Vanilla Bean Crème Brûlée Cheesecake Cupcakes are a luxurious treat that unites elegance with accessibility. The balance of flavors and textures is sure to impress anyone lucky enough to taste them.
With just a few steps, you can create an indulgent dessert that feels like it came straight from a high-end bakery. Your loved ones will be raving about these cupcakes for days to come.
Recipe Card
Notes
Additional serving suggestions: pair with a crisp salad, garlic bread, or roasted seasonal vegetables for balance.
For make-ahead, prep components separately and assemble just before heating to preserve texture.
Taste and adjust with acid (lemon/vinegar) and salt right at the end to wake up flavors.


