Introduction
If you're searching for a delightful treat that combines creamy textures and vibrant flavors, look no further than white chocolate raspberry cheesecake balls. These bite-sized delights encapsulate the indulgence of cheesecake and the tartness of raspberries in a playful, easy-to-make form. Whether for a special occasion or simply to satisfy your sweet tooth, these treats are sure to impress.
The combination of rich white chocolate and refreshing raspberries creates a perfect culinary harmony. Each bite delivers a burst of flavor paired with a delightful crunch from the graham cracker coating. Plus, they are easy to prepare, making them ideal for both novice and experienced home cooks alike.
Ingredients
- 8 oz cream cheese, softened
Cream cheese is the foundation of our cheesecake balls, providing a rich and creamy texture that binds the ingredients together. It adds a slight tanginess, balancing the sweetness of the white chocolate and raspberries. - 1 cup white chocolate chips
White chocolate contributes a luxurious sweetness and smoothness to the mixture. It complements the tartness of raspberries while helping to firm up the cheesecake balls as it cools. - 1/2 cup powdered sugar
Powdered sugar adds sweetness and blends smoothly into the mixture, ensuring there are no gritty textures. It helps to achieve the desired creamy consistency without overwhelming the flavor. - 1/2 cup fresh raspberries, crushed
Fresh raspberries provide a burst of flavor and a hint of acidity, balancing the richness of the white chocolate and cream cheese. Their vibrant color also makes the cheesecake balls visually appealing. - 1 tsp vanilla extract
Vanilla extract enhances the overall flavor profile, adding a warm and aromatic quality. It complements the sweetness of the chocolate while tying the flavors together. - 1 1/2 cups graham cracker crumbs
Graham cracker crumbs act as both a coating and a textural element in these cheesecake balls. They provide crunch and a hint of cinnamon, reminiscent of traditional cheesecake crust. - 1/4 cup melted coconut oil
Coconut oil helps to bind the mixture and provide a smooth, creamy mouthfeel. It also adds a subtle tropical flavor, enhancing the overall taste without overpowering other ingredients.
Directions & Preparation
Step 1: Prepare the crust ingredients.
Start by combining the graham cracker crumbs and melted coconut oil in a mixing bowl, mixing well until the crumbs are evenly coated. This step is crucial as it creates the crunch that will coat the cheesecake balls, adding texture and preventing them from becoming too soft. Set aside a portion of this mixture for later use.
Step 2: Blend the cheesecake mixture.
In a separate bowl, beat the softened cream cheese using an electric mixer until smooth. Gradually add in the powdered sugar, white chocolate chips, vanilla extract, and the crushed raspberries. Mixing them well is essential to achieve a uniform consistency and incorporate all flavors. This step ensures that each cheesecake ball is packed with creamy goodness and tart raspberry flavor.
Step 3: Chill the mixture.
Transfer the blended cheesecake mixture into the fridge for about 30 minutes. Chilling allows the mixture to firm up, making it easier to scoop and shape into balls later. Proper chilling also enhances the flavors, allowing them to meld beautifully together.
Step 4: Scoop and shape the balls.
Using a cookie scoop or tablespoon, scoop out portions of the chilled cheesecake mixture and roll them into balls. This step is both fun and tactile as you feel the mixture transform into smooth balls. Aim for roughly the size of a walnut for bite-sized treats, ensuring they will hold their shape well during the coating process.
Step 5: Coat the balls in graham cracker mixture.
Roll each cheesecake ball in the reserved graham cracker crumbs until fully coated. This not only adds a delightful crunch but also provides a visual contrast against the creamy filling. Ensure they're evenly coated to enhance both appearance and texture, keeping them from becoming mushy and maintaining their character.
Step 6: Chill again before serving.
Place the coated cheesecake balls back in the refrigerator for at least 30 minutes to set. This final chill ensures they firm up properly, making them easier to handle and more enjoyable to eat. The flavors will deepen as they rest, resulting in a truly delicious treat.
Step 7: Serve and enjoy.
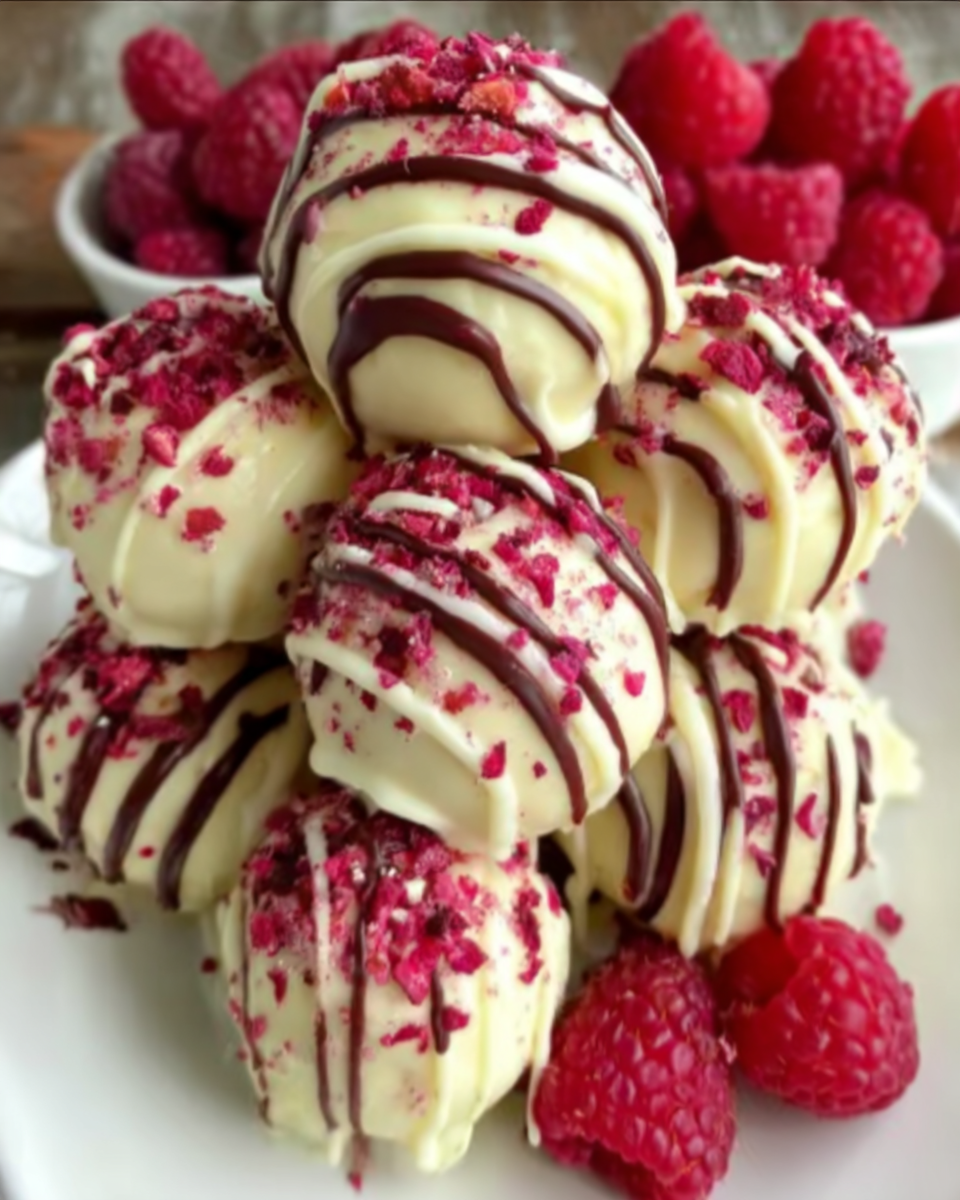
Once set, serve your white chocolate raspberry cheesecake balls on a pretty platter. These delightful bites are perfect for sharing at parties or as a personal treat. Each bite bursts with creaminess and lively raspberry flavor, creating a delightful experience you'll want to enjoy again and again.

Creative Flavor Variations
While the classic white chocolate and raspberry combination is undeniably delicious, don’t hesitate to experiment with different flavors. Consider substituting the raspberries with other berries like strawberries or blackberries for a unique twist. Adding a splash of citrus zest can also brighten the flavor profile, offering a refreshing contrast to the sweetness of the cheesecake balls.
Perfect Pairings for Your Cheesecake Balls
These cheesecake balls pair wonderfully with a variety of beverages and snacks. A glass of chilled dessert wine or a fruity sparkling beverage enhances the flavors beautifully. For an added treat, consider serving them alongside a light fruit salad or some dairy-free whipped cream to balance the richness, ensuring a harmonious dessert experience.
Presentation Tips for the Perfect Bite
Presentation is key when serving your white chocolate raspberry cheesecake balls. Consider placing them in mini cupcake liners for an elegant touch and easier serving. For a gourmet finish, drizzle some melted white chocolate over the top or sprinkle some additional crushed raspberries to add color and flair, making them not only a treat for the taste buds but also a feast for the eyes.
FAQs
What if I want to adjust the sweetness of the balls?
If you find the mixture too sweet, reduce the powdered sugar to suit your taste. You might also consider adding a pinch of salt to balance the sweetness or increasing the amount of raspberries for a tart kick.
How can I ensure the cheesecake balls hold their shape?
To maintain the shape of your cheesecake balls, make sure the mixture is adequately chilled before rolling. If the mixture feels too soft, consider returning it to the fridge for a longer period until it firms up for easier handling.
Can I use a different type of chocolate in this recipe?
Yes, you can substitute white chocolate with milk or dark chocolate for a different flavor experience. However, keep in mind that this will alter the overall sweetness and slightly change the flavor profile of the cheesecake balls.
What should I do if my cheesecake mixture is too thick?
If the mixture is too thick and difficult to scoop, consider adding a teaspoon of milk or cream to loosen it up slightly. Mix well until you achieve your desired consistency, but be careful not to overdo it.
Can I use frozen raspberries instead of fresh ones?
Yes, frozen raspberries can work in this recipe, but ensure to thaw and drain excess liquid before incorporating them into the cheesecake mixture. This prevents the mixture from becoming too watery and affecting the texture of the balls.
How can I add more flavor to the filling?
You can enhance the filling's flavor by incorporating extracts, such as almond or lemon, for a unique twist. Additionally, mixing in some finely chopped nuts or mini chocolate chips can provide extra texture and taste.
Conclusion
Making white chocolate raspberry cheesecake balls is not only a rewarding experience, but it also results in a delicious treat perfect for any occasion. With their creamy texture, vibrant color, and delightful flavor profile, these cheesecake balls are sure to impress friends and family.
Whether you're celebrating a special event or simply want to enjoy a moment of indulgence, this recipe delivers. Embrace your creative side and enjoy the journey of crafting these sweet, satisfying bites that are as delightful to make as they are to eat.
Recipe Card
Notes
Additional serving suggestions: pair with a crisp salad, garlic bread, or roasted seasonal vegetables for balance.
For make-ahead, prep components separately and assemble just before heating to preserve texture.
Taste and adjust with acid (lemon/vinegar) and salt right at the end to wake up flavors.


